Release Notes
First Week Of The Month
New Features
Download Documents Before Signature Completion
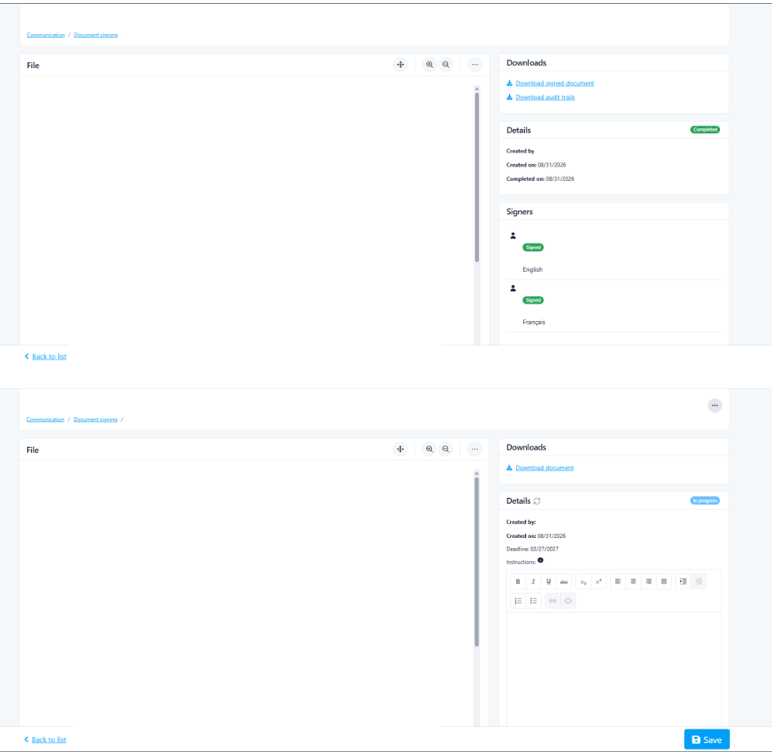
This release enhances the electronic signature document download process, allowing authorized users to download a document even when the signature process has not yet been completed.
Past State
Previously, documents could be downloaded while a signature process was in progress, but the download functionality could be restrictive when all expected signatures had not been completed.
This could create difficulties when a document had a large number of signatories and some individuals were unable to complete their signatures. In these situations, users could be unable to retrieve the document even when they needed to access the version containing the signatures that had already been completed.
What’s New
With this release, users with the appropriate download permission can download a document even when the signature process is not yet complete.
The downloaded document reflects the current state of the signature process, including any signatures that have already been completed.
How It Works
When a document is still going through the electronic signature process, the Download File action can be used to retrieve the current version of the document.
The downloaded file reflects the current state of the signing process. Signatures that have already been added to the document will be included, even if other signatories have not yet completed their signatures.
This provides more flexibility when, for example, some signatories are unable to complete the process or the document needs to be retrieved before all signatures are collected.
The existing five-minute delay between downloads of a document that is still in progress continues to apply.
Once the document is Completed, users can download the final signed document and, where available, the audit trail.
Where to Find It
You can find this feature in: Electronic Signatures > Signature Details
To access it:
Open the relevant electronic signature.
In the Downloads section, select Download File for a document that is still in progress.
Open the downloaded document to view its current signature status and completed signatures.
Benefits
Allows documents to be retrieved without waiting for every signatory to complete the process.
Makes it easier to manage documents with a large number of signatories.
Provides access to signatures that have already been completed.
Prevents incomplete signature processes from unnecessarily blocking access to the current document.
Important Notes
The Downloads section and download actions are available only to users who have permission to download electronic signature documents and when electronic signatures are enabled for the property.
The downloaded document represents the current state of the signing process. The audit trail remains available only once the signature process has been completed.
For documents that are still in progress, a five-minute delay applies between successive downloads.
Improvements
Selective Balance Viewing and Payment Allocation
This release introduces Selective Balance Viewing and Payment Allocation, designed to give co-owners greater control over which outstanding balances are displayed, downloaded, and paid through UpperBee Pay.
Previously, all receivables associated with an owner's account were combined into a single balance. This included condominium fees, claim-related charges ("sinistre"), moving fees, and other receivables.
As a result, co-owners who wished to pay only a specific balance could not do so.
They were required to pay the full displayed balance or use alternative payment methods, leading to payment refusals, delays, and additional administrative work.
What's New
With this release:
Users can now choose which receivable categories are displayed on their account statement.
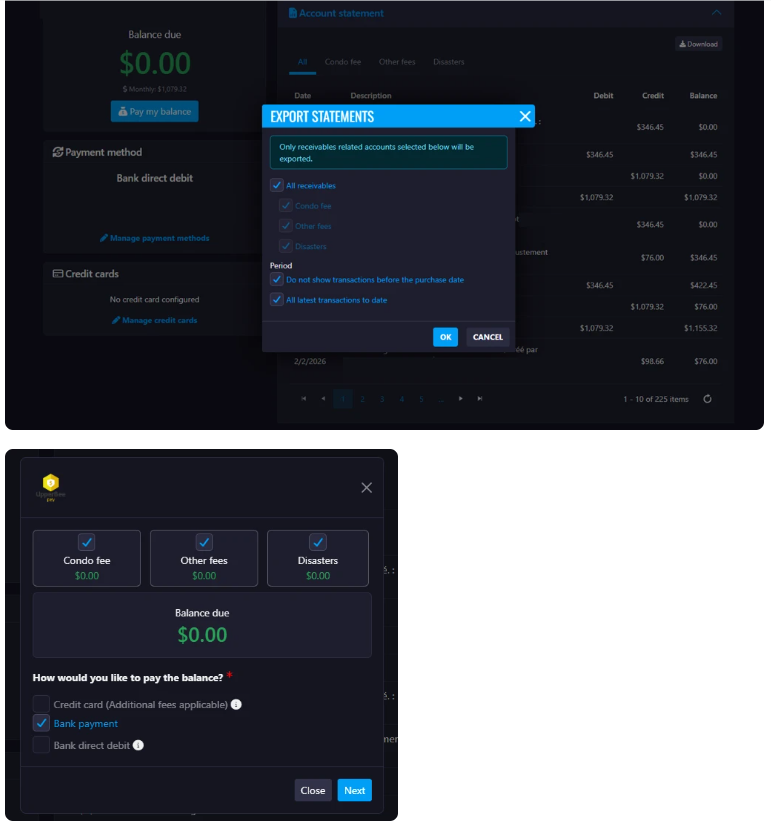
The Statement Download popup now allows users to select which balances to include:
All Receivables
Claim-Related Charges (Sinistres)
Condominium Fees
The Pay My Balance popup now allows users to select which receivable categories they want to pay.
The displayed payment amount is automatically updated based on the selected receivable categories.
Payments are applied automatically according to account priority rules:
If Condominium Fees are selected, the payment is applied to the Condominium Fees account.
If multiple categories are selected, the payment is applied to the selected account with the lowest account number.
How It Works
Navigate to the UpperBee Pay payment section.
Select Pay My Balance or Download Statement.
Choose the receivable categories you want to view, download, or pay:
All Receivables
Claim-Related Charges (Sinistres)
Condominium Fees
The displayed balance automatically updates based on the selected categories.
Complete the payment or download the customized statement.
The payment is automatically assigned to the appropriate account according to the account priority rules.
Where to Find It
You can find this feature in: UpperBee Pay
To access it:
Open the Owner Portal.
Navigate to UpperBee Pay.
Select Pay My Balance or Download Statement.
Benefits
Allows co-owners to pay only the balances they wish to settle.
Reduces payment delays and payment refusals.
Improves transparency by separating different types of receivables.
Simplifies account statement generation.
Provides greater flexibility when managing account balances and payments.
 Important Notes
Available receivable categories depend on the accounts configured for the property.
Selecting multiple categories combines the selected balances into a single payment amount.
Payments are automatically applied to the eligible account with the lowest account number according to the configured payment allocation rules.
This enhancement affects both balance display and payment selection workflows.
Second Week Of The Month
New Features
Weekly Financial & Supplier Activity Digest
This release introduces the Weekly Financial & Supplier Activity Digest, designed to improve transparency and governance by providing board members with a weekly summary of supplier activity and issued payments.
Past State
Previously, board members had limited visibility into supplier changes and payment activity unless they manually reviewed supplier records, invoices, or payment transactions within the platform.
As a result, important supplier additions, banking information changes, and recently issued payments could go unnoticed, making oversight and governance more difficult.
What's New
With this release:
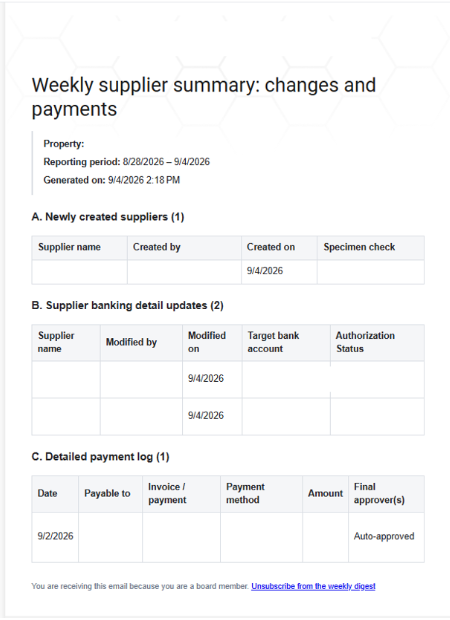
A new weekly email digest summarizes supplier and payment activity for each property.
Board members receive visibility into:
Newly created suppliers
Supplier banking information changes
Payments issued during the previous week
Supplier change notifications include:
Supplier name
User who made the change
Date of the change
Cheque specimen or supporting document link (when available)
Banking detail updates include:
Updated banking account information
User who made the modification
Authorization status
Payment summaries include:
Payment date
Supplier name
Invoice number
Payment number
Payment method
Invoice link
Final approver(s) or approving board member(s)
Users can subscribe or unsubscribe from these email notifications:
Directly from the email through an unsubscribe link
From their user profile settings
How It Works
The system tracks supplier-related activities throughout the week.
Changes are grouped into a weekly summary by property or syndicate.
A digest email is automatically generated and sent to subscribed recipients.
The email includes:
Newly created suppliers
Supplier banking information updates
Payments issued during the reporting period
Users can manage their notification preferences through their profile or by clicking the unsubscribe link included in the email.
Where to Find It
You can find this feature in: Email Notifications and User Profile Settings
To access it:
Open your User Profile.
Navigate to Notification Preferences.
Enable or disable the Weekly Financial & Supplier Activity Digest.
Benefits
Improves financial transparency for board members.
Provides timely visibility into supplier onboarding and banking changes.
Simplifies oversight of payments approved and issued each week.
Reduces the need for manual monitoring and reporting.
Gives users control over notification preferences.
Important Notes
The digest summarizes activity from the previous reporting period.
Only subscribed users will receive the weekly email.
Users can unsubscribe at any time using the link contained in the email.
For security purposes, administrators impersonating another user cannot access or modify that user's notification preferences.
User profiles are not accessible while operating in impersonation mode.
Budget Page Enhancement / Clickable Account Links
This release introduces the option for users to click on Account Names and GL Accounts directly from the Budget page to quickly access the corresponding General Ledger (GL) details. This affects users with the proper roles like property managers and accounting users.
Past State
Previously, the user could not access quickly to the general ledger details by clicking the name of the account.
How It Works
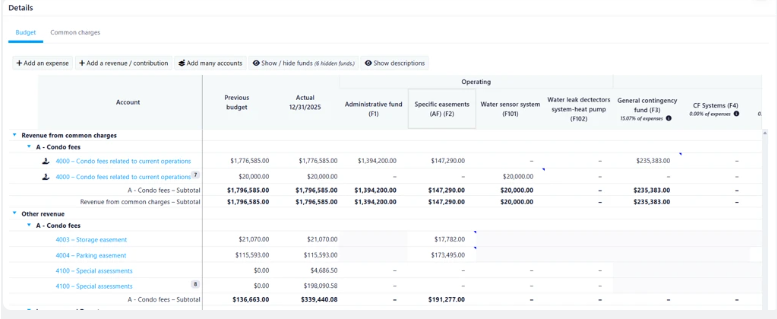
Account names and GL account numbers displayed on the Budget page are now clickable links providing a faster and more intuitive navigation experience between budget planning and financial review activities.
Where to Find It
You can find this feature in: Accounting / Budgets / Select a budget
To access it:
In the Accounting menu, go to the Budgets page.
Select a budget and click Detail to open it.
Scroll down and locate the Account column.
Notice the account names are now hyperlink.
Click one to open the Transactions page.
Benefits
Reduces the number of steps required to access GL information.
Improves efficiency for property managers and accounting users during budget analysis and validation.
Helps users quickly investigate account activity without leaving the budget workflow.
Improvements
Restricted Access to UpperBee Pay Pages
This release introduces enhanced security controls for selected UpperBee Pay pages. Access to these pages is now restricted to authorized users who have successfully completed the required background verification through the Sûreté du Québec.
Previous State
Previously, UpperBee Pay pages were accessible to users regardless of their background verification status.
How It Works
When a user attempts to access a restricted UpperBee Pay page without the necessary clearance, an access denied message will be displayed, preventing unauthorized access to the information and functionality on that page.
Where to Find It
This enhancement applies to specific pages within the Admin Module.
Access Information:
The location and list of restricted pages are known only to authorized users.
Users without the required clearance will be denied access automatically.
Benefits
Enhanced Data Security
Restricts access to sensitive payment-related information, reducing the risk of unauthorized data exposure.Regulatory and Compliance Support
Helps ensure that access to critical financial information is limited to personnel who meet the organization's security requirements.
Security Editor and Content Sanitization
This release introduces enhanced security and content sanitization for Kendo Editors, designed to prevent potentially malicious HTML and JavaScript content from being stored or rendered through the application.
Past State
Previously, certain HTML content using encoding or other techniques could bypass part of the existing sanitization process. In some cases, encoded JavaScript content could be decoded during server-side sanitization without being completely removed, potentially leaving unsafe content in the resulting HTML.
What’s New
With this release, the sanitization process has been enhanced to better handle potentially malicious and obfuscated HTML content, including content using encoded JavaScript, unsafe links, event handlers, and other known XSS filter-evasion techniques.
The validation and sanitization process now ensures that potentially executable JavaScript cannot be introduced through Kendo Editors.
How It Works
When content is entered into a Kendo Editor and submitted:
The content is processed by the application.
Potentially unsafe HTML and JavaScript content is identified and sanitized.
Dangerous elements, attributes, or URLs are removed or neutralized.
The sanitized content is stored and safely rendered when the page is viewed or edited again.
The sanitization is applied throughout the content lifecycle to ensure that malicious content cannot become executable after being decoded, saved, retrieved, or rendered.
Where to Find It
This security enhancement applies automatically to all Kendo Editors throughout the application.
To access it:
Navigate to a page containing a Kendo Editor.
Enter or edit content in the editor.
Save the content as usual.
No additional configuration or user action is required.
Benefits
Improved security by preventing potentially executable JavaScript from being introduced through rich-text content.
Enhanced protection against encoded and obfuscated XSS techniques.
Safer content handling when content is saved, retrieved, edited, and displayed.
Preserved functionality for legitimate HTML formatting and supported rich-text content.
Important Notes
This update is a security enhancement to the existing Kendo Editor sanitization process. Users can continue using Kendo Editors normally; no additional action or configuration is required.
Display Client Account Number in Transactions
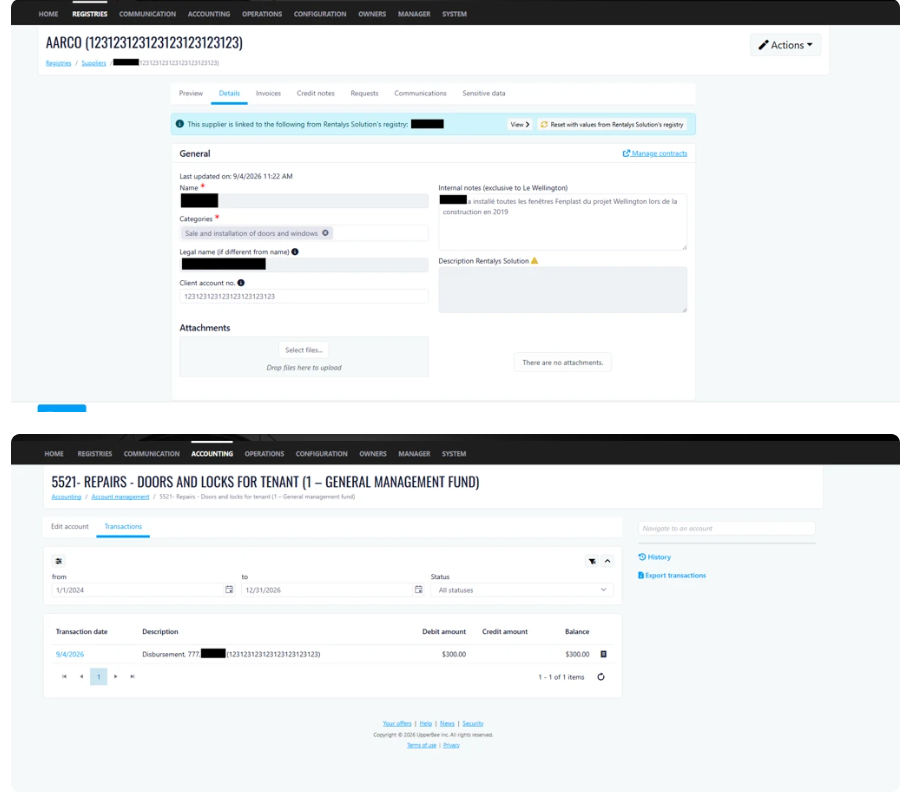
This release introduces the display of the client account number alongside the supplier name within account transactions. This enhancement provides greater visibility into supplier-related information and makes it easier to identify and reconcile transactions.
How It Works
When a client account number is entered in the Supplier Registry, it will now automatically be displayed in the Transactions section of Account Management. The client account number appears as part of the transaction description, allowing users to quickly reference supplier account information without leaving the transaction view.
Where to Find It
Accounting > Accounts Management
To Access It
Navigate to Accounting > Accounts Management.
Select an account and click Edit.
Open the Transactions tab.
Locate the Client Account Number displayed within the transaction description.
Previous Behavior
Previously, the client account number was not displayed in account transactions. Users had to navigate to the Supplier Registry to view or verify this information.
Benefits
Improved Efficiency: Access supplier account information directly from transactions, reducing the need to switch between screens.
Faster Reconciliation: Easily identify and match transactions with supplier records during account reconciliation and auditing activities.
Enhanced Visibility and Accuracy: Reduce the risk of errors by providing immediate access to supplier account references within transaction details.
Third Week Of The Month
New Features
Summary for Notes
This release introduces Summary for Notes, designed to highlight key information at the top of a request and make important details easily accessible to users.
Past State
Previously, users could only add notes to a request. There was no dedicated area to maintain a pinned summary of important information, requiring users to search through notes for key details.
What’s New
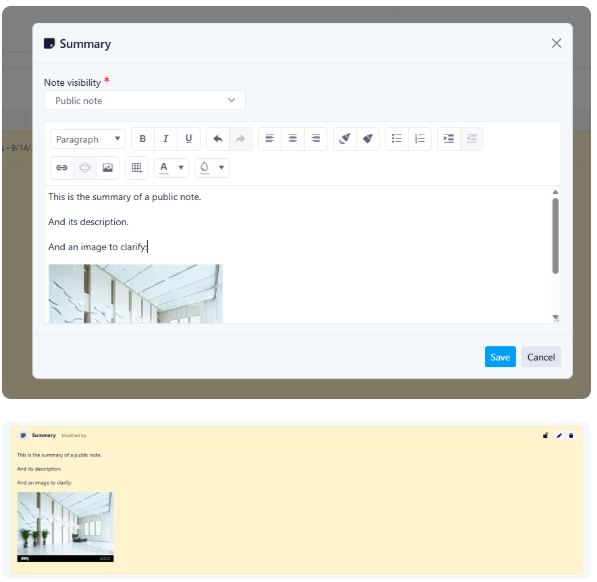
With this release, users can create and maintain a dedicated Summary that remains pinned at the top of a request. The Summary supports the same editing capabilities as notes and includes visibility settings to control access.
How It Works
A new Summary icon is available in the Notes section of a Request.
Selecting the icon opens a Summary editor.
The Summary supports the same formatting and functionality available in Notes.
Users can define Summary visibility using the same permissions available for Notes:
Public
Administrator
Management
Users who have permission to view the Summary can also edit or delete it.
Only one Summary can exist per Request at a time.
The Summary remains pinned at the top of the Request for easy access.
Creating or updating a Summary does not trigger email notifications.
Exports now include a new Include Summary option.
Where to Find It
You can find this feature in: Requests > Notes
To access it:
Open a Request.
Navigate to the Notes section.
Click the Summary icon to create or manage a Summary.
Benefits
Improves visibility of key request information.
Reduces time spent searching through notes.
Provides controlled sharing of important information through visibility settings.
Important Notes
Only one Summary can be created per Request.
Summary visibility follows the same permissions as Notes.
Users who can view the Summary can also edit or delete it.
Creating or updating a Summary does not send email notifications.
The Summary can be included in exports by selecting the Include Summary option.
Billable Hours Dashboard ( BETA )
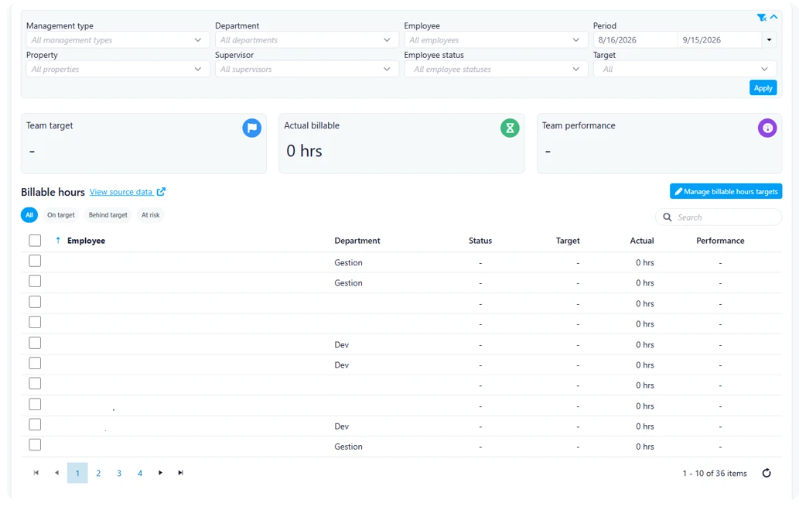
This release introduces the Billable Hours Dashboard, designed to provide managers with a centralized view of billable hours performance against employee and team targets. The dashboard helps managers monitor progress, identify performance gaps, and track achievement against weekly billable hour goals.
Past State
Previously, managers were required to manually review billable hour data from spreadsheets and compare actual hours against targets. This process was time-consuming, lacked visibility into team performance, and made it difficult to quickly identify employees who were falling behind their goals.
What's New
With this release, managers can now access a dedicated Billable Hours Dashboard that consolidates target and actual billable hour data in a single location. The dashboard provides:
Employee target management
Team performance metrics
Actual versus target comparisons
Current and historical period analysis
Performance status indicators
Detailed employee-level breakdowns and filtering options
How It Works
Add Targets
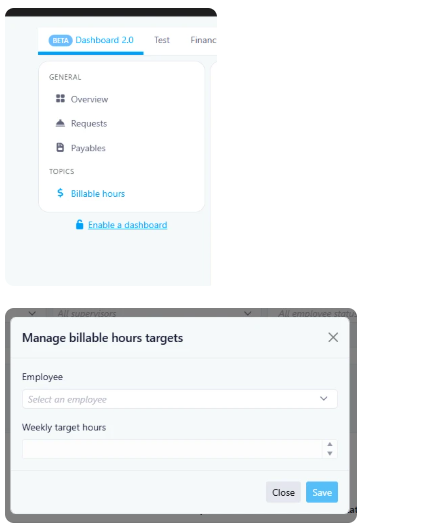
Managers can create and maintain weekly billable hour targets for employees by entering:
Employee Name (dropdown selection)
Department (automatically populated where applicable)
Weekly Target (numeric values between 1 and 120 hours)
Joined Since date
Dashboard Metrics
The dashboard displays:
Team Target
Actual Billable Hours
Team Performance
Note: Metrics display numerical values only and do not directly indicate risk levels. Upon initial setup, all records will display as red until billable hours are recorded and performance data becomes available.
Billable hours performance is calculated based on the difference between actual billable hours and assigned targets.
Period Analysis
Current Period When a date range includes the current period (for example, the previous 4 days and next 3 days), the dashboard displays real-time results, including:
Team Target
Actual Billable Hours
Team Performance
Historical Comparison When users select a completed period such as the last 7 days or last 30 days, the dashboard compares actual billable hours against established targets for that timeframe.
Employee Performance Status
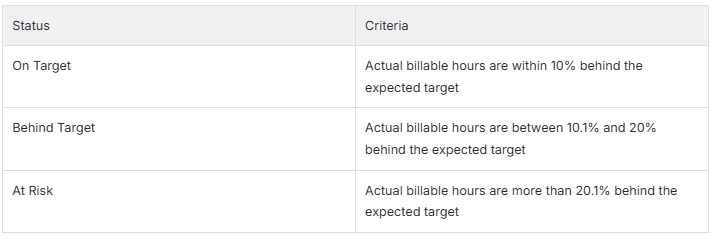
The dashboard automatically categorizes performance based on target achievement:
List View of Results
Managers can view a detailed breakdown including:
Employee Name
Department
Property
Status
Target Hours
Actual Billable Hours
Performance
Percentage Completed
Available actions include:
View Target Details
Delete Target Records
View Source Data (Work in Progress and Invoicing)
Filters
The dashboard supports filtering by:
All Records
On Target
Behind Target
At Risk
Employee
Performance
Billable Hours
Where to Find It
You can find this feature in: Dashboard → Billable Hours
To access it:
Navigate to Dashboard
Select Billable Hours
Review team performance metrics or manage employee targets
Benefits
Provides managers with real-time visibility into billable hour performance
Eliminates manual spreadsheet tracking and target comparisons
Helps identify performance risks early through automated status calculations
Improves accountability with employee and team-level reporting
Simplifies target management and performance monitoring
Important Notes
Weekly targets can only contain numerical values between 1 and 120.
Performance statuses are automatically calculated based on the variance between actual and expected billable hours.
Metrics display numerical performance data only; risk evaluation is reflected through status indicators.
Newly created targets may initially appear in the red status until billable hour data becomes available.
Improvements
Last Week Of The Month
New Features
Redesigned Global Search Experience
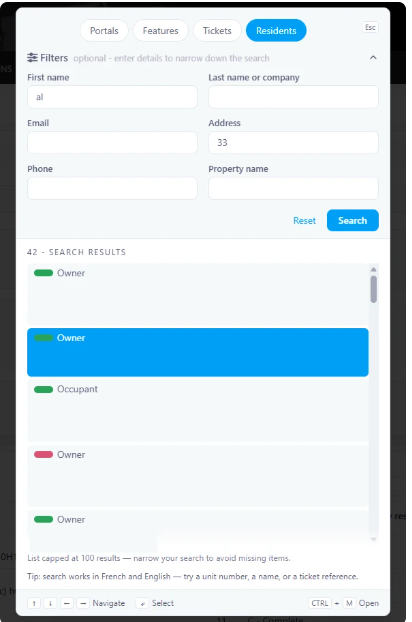
This release introduces a redesigned Global Search experience, designed to make searching across UpperBee faster, more intuitive, and more accessible. The update includes a new search location in the header, a redesigned search pop-up, and enhanced search experiences for Portals, Features, Tickets, and Residents.
Past State
Previously, the search function was accessed through an icon located on the right side of the header. Search experiences varied depending on the category, and some searches, such as Residents, redirected users to a separate page to view results.
What's New
With this release:
The search pop-up has been completely redesigned.
Search results now display directly within the pop-up experience.
New result counters, empty states, and no-result states have been added.
Tickets and Residents searches now include filter sections to help refine results.
Search result layouts have been redesigned for improved readability.
How It Works
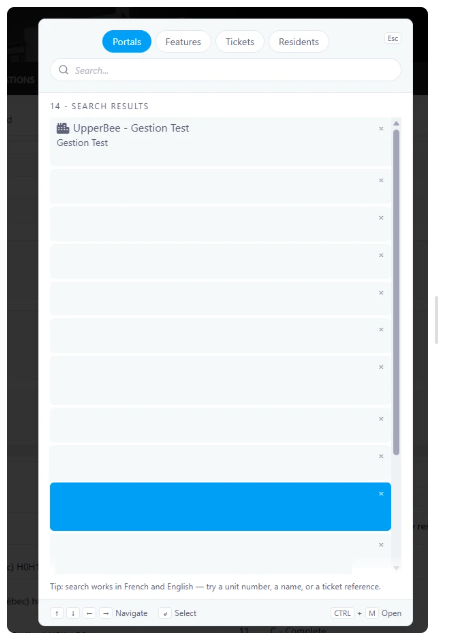
Users can open the new Global Search directly from the header and use the available tabs to search across different categories.
Portals
Search results now display:
Portal name
Legal name
Address information
Contract end date
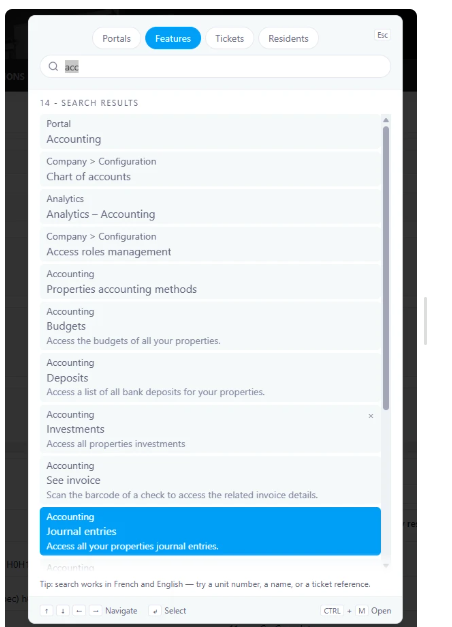
Features
Search results now display:
Breadcrumb navigation
Feature name
Description
Result count
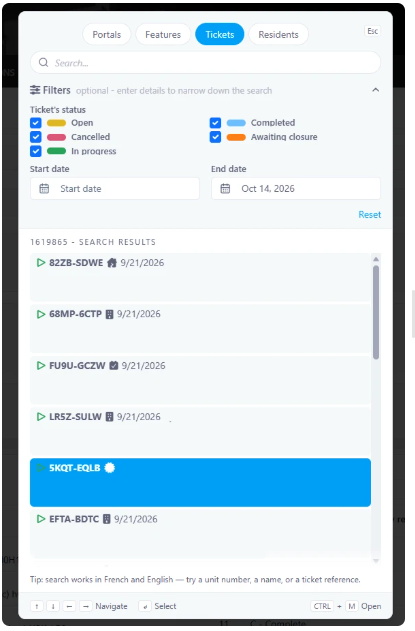
Tickets
Users can refine searches using filters:
Status
Open (Yellow)
In Progress (Green)
Completed (Blue)
Awaiting Closure (Orange)
Cancelled (Red)
Additional Filters
Start Date
End Date
Results display:
Ticket number
Date
Property name
Title
Description preview
Residents
Resident searches now remain within the search pop-up.
Available filters:
First Name
Last Name or Company
Email
Address
Phone Number
Property Name
Results display:
Status indicator
Resident name
Role (Owner or Occupant)
Property name
Resident search results are limited to 100 results. Users can apply filters to further narrow their search when needed.
Where to Find It
You can find this feature in: The Global Header
To access it:
Log in to UpperBee.
Click the search bar located in the center of the header.
Select a tab (Portals, Features, Tickets, or Residents) and start searching.
Benefits
Faster access to search from anywhere in the platform.
More relevant results through advanced filtering options.
Improved user experience with modern layouts and integrated search results.
Important Notes
Ticket searches can be refined using status and date filters.
Resident searches are capped at 100 results to maintain optimal performance.
Search functionality is available directly within the search pop-up without navigating away from the current page.
Improvements
Budget Multi-Select Filters
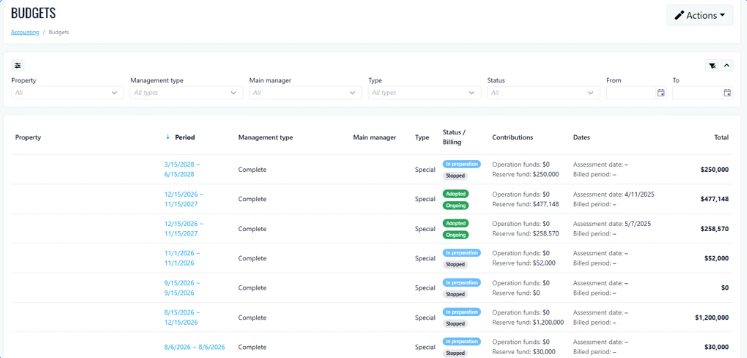
This release introduces Budget Multi-Select Filters, designed to provide better budget visibility across teams and managers directly within UpperBee, reducing the need to export data to Excel for advanced filtering.
Past State
Previously, users could only filter budget data using single-selection filters. To analyze multiple teams, managers, or categories simultaneously, users often had to export budget data to Excel and use Excel's filtering capabilities.
What’s New
With this release, users can now select multiple values within budget filters, making it easier to refine and analyze budget information directly in UpperBee.
How It Works
Users can now choose multiple options from supported filter lists within the Budget module. The budget view updates automatically to display data matching all selected filter criteria, allowing users to compare and analyze multiple teams, managers, or other budget segments in a single view.
Where to Find It
You can find this feature in: Budget Module
To access it:
Navigate to Budget.
Open the desired filter dropdown.
Select one or more values to refine the displayed budget data.
Benefits
Analyze multiple teams or managers at the same time.
Reduce dependency on Excel exports.
Improve efficiency and decision-making directly within UpperBee.
Important Notes
Multi-selection is available on supported budget filters.
Filter selections remain active until modified or cleared by the user.
Was this article helpful?
That’s Great!
Thank you for your feedback
Sorry! We couldn't be helpful
Thank you for your feedback
Feedback sent
We appreciate your effort and will try to fix the article