Release Notes
First Week Of The Month
New Features
Rental of units, parking spaces, and lockers.
Overview
How It Works
Where to Find It
- Navigate to the rental management page for your property.
- Click the Actions button (pencil icon) at the top of the page.
- Select 'Unit Rentals', 'Parking Rentals', or 'Locker Rentals' from the dropdown.
- The export file will download automatically.
Benefits
- Instantly know which parking spots and lockers are currently free — no need to manually cross-reference reservation dates.
- The four-state Status column (Available, Reserved, Rented, Rented and Reserved) eliminates ambiguity about occupancy.
- The Reservation Date column makes upcoming turnovers visible at a glance, helping staff plan ahead.
Screenshot

Important Notes
Rent History for Vacant Occupancy Reporting
Past State
What’s New
- Add historical rent entries with an effective date
- Maintain multiple rent records over time
- Preserve previous rent values even after lease updates or conversions
How It Works
- Effective Date
- Rent Amount
- The existing “Last Rent” field remains available
- A new “Rent Effective Date” column has been added to support updates and synchronization
Where to Find It
- Navigate to Property Assets
- Open a rental Unit, Locker, or Parking asset
- Scroll to the new “Rent History” section
Benefits
- Improves accuracy of Occupancy and Vacancy reports
- Preserves historical rent information over time
- Enables future reporting, KPI tracking, and analytics opportunities


Important Notes
- Rent History is only used when the asset is vacant.
- Historical entries should include accurate effective dates to ensure proper reporting results.
- Import templates now include an additional Rent Effective Date column.
Expense Type Description Configuration
Past State
What’s New
How It Works
- Managers configure expense types for a building.
- A new Description textarea is available beneath each expense type.
- Managers can enter and save a custom description for each expense type.
- When creating an invoice or charge, the system automatically retrieves the configured description and populates the invoice description field.
- Users can review and edit the description before finalizing the invoice if needed.
Where to Find It
- Navigate to the Building Management section.
- Open the desired building configuration.
- Locate the Expense Types configuration area and enter a description beneath each expense type.
Benefits
- Reduces manual data entry during invoicing.
- Ensures consistency in expense descriptions across invoices.
- Improves efficiency and reduces the risk of user errors.


Important Notes
- Description fields are optional.
- Existing expense type configurations remain unchanged unless a description is added.
- Users can modify the auto-populated description during invoice creation if required.
Service Review Dashboard
What’s New
- View client feedback statistics in a centralized dashboard
- Filter results by property, supervisor/department, employee, and date range
- Analyze feedback by specific survey questions (Q1/Q2)
- View employee and building performance rankings
- Access request type scoring and review breakdowns
- Sort and paginate large result sets for easier analysis
How It Works
Where to Find It
To access it:
- Proceed to Company
- Navigate to Dashboards - Service Reviews Dashboard
- Apply filters or select review questions to analyze results
Benefits
- Improved visibility into client satisfaction trends
- Easier performance tracking for employees and buildings
- Faster identification of service improvement opportunities

Important Notes
- The default dashboard range displays data from the last 90 days.
- Employee results dynamically update based on selected property and supervisor filters.
- Pagination is automatically enabled for large result sets.
Custom Homepage Tiles
How It Works
- Entering a title (up to 30 characters)
- Providing a destination URL
- Selecting a visual representation using:
- A predefined icon
- A predefined image
- A custom uploaded image
Where to Find It
- Navigate to the desired Property.
- Open Property Home Page Settings.
- Locate the Custom Homepage Tiles section.
Past State
What's New / What's Changed
- Added a new Custom Homepage Tiles section in Property Home Page Settings.
- Added the ability to enable or disable custom tiles per property.
- Added support for up to three custom tiles per property.
- Added custom title and URL configuration.
- Added support for selecting predefined icons and images.
- Added support for uploading custom tile images.
- Added a tile preview before saving.
- Added validation for required fields, invalid URLs, unsupported image formats, and image size limits.
Benefits
- Provide quick access to property-specific resources and information.
- Increase flexibility and customization of property homepages.
- Improve user experience by highlighting important links and destinations.


Important Notes
- Custom tiles are configured independently for each property.
- A valid URL and title are required before a tile can be saved.
- Uploaded images must not exceed 10 MB.
- If a custom image is uploaded, it will take precedence over any selected default icon or image.
- Custom tiles only appear when the feature is enabled.
Improvements
w

Save Filters on List Screens
This release introduces persistent list filters, designed to preserve the active filter state when a user navigates away from a list screen and returns to it.
Past State
Previously, when users applied a filter on a list screen to search for specific information, then clicked on a row to view details and navigated back, the filter was lost and the list reset to its unfiltered state — requiring users to re-apply the filter manually each time.
What's New
With this release, filters applied on list screens are now automatically saved. When a user clicks on a row and then returns to the list, the filter is restored and the list remains filtered exactly as the user left it.
How It Works
When a filter is applied on a supported list screen, the filter state is saved automatically. Upon returning to the list (e.g. after viewing a record detail), the saved filter is reloaded and the list is re-filtered accordingly. No manual action is required from the user.
Where to Find It
You can find this feature in: all major list screens within the property module.
To access it:
Navigate to any supported list screen (Purchase Orders, Invoices, Special Charges, Journal Entries, or Leases)
Apply one or more filters to the list
Click on any row to open its detail view
Navigate back to the list — the filter will be automatically restored
Benefits
Saves time by eliminating the need to re-apply filters after viewing a record
Improves navigation flow for users who frequently drill into records while filtering
Consistent behavior across all supported list screens
Screenshot

Due Date Management for Invoices
Past State
What’s New
- A new optional Due Date field has been added during document reception for invoices.
- Due dates are now displayed across invoice-related views and payment workflows.
- Users can sort invoice lists by Due Date.
- Due date information is included in invoice notification and reminder emails.
- Due dates can be modified after invoice creation when editing invoice details.
- A new Due Date search option has been added to payment lists.
How It Works
- Invoice Details page (under the Date field).
- Invoice List (new Due Date column with sorting support).
- Document Submission Details (displayed in the information panel).
- Payment Creation page (new Due Date column in the invoices-to-pay table).
- Payment List (Due Date available in the "Search by Date" filter using the existing From/To date pickers).
- Pending Invoices Report email notifications.
- Payment Approval Reminder email notifications.
Where to Find It
- Document Reception
- Invoice Details
- Invoice List
- Document Submission Details
- Payment Creation
- Payment List
- Invoice-related notification emails
To Access It
- Navigate to the Document Reception module.
- Create or review an invoice.
- Enter, view, modify, sort, or filter invoices using the Due Date field where applicable.
Benefits
- Improves visibility of invoice payment deadlines.
- Helps users prioritize and plan upcoming payments.
- Provides consistent due date information across invoices, payments, and notifications.
Screenshot

Important Notes
- The Due Date field is optional.
- This functionality applies to invoices.
- Existing date filters in the Payment List are reused when searching by Due Date; no additional filter controls were added.
Second Week Of The Month
New Features
Improvements
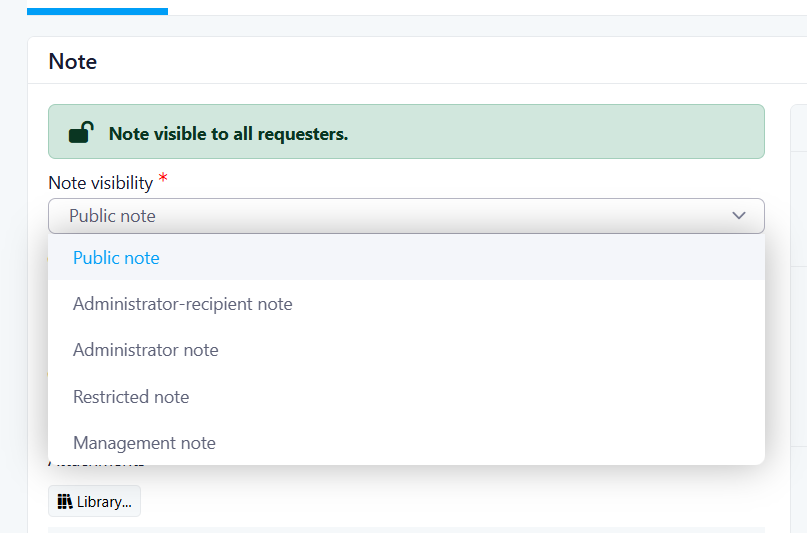
External Participant Notes Visibility & Privacy Controls
Past State
What's New
- Notes visibility permissions are now consistently enforced across the platform.
- External participants can only view notes that are permitted by their visibility settings.
- External participants can only reply to notes they are authorized to access.
- Visibility behavior now applies to all supported participant types, including:
- Board Members
- Union Employees
- Owners
- Exported requests now respect note visibility permissions.
- Notes that are not accessible to a user will not appear in exported files.
- Privacy controls have been standardized across Work Items, Communications, and Request Exports.
- When note type selection is unavailable, users can only create or reply using a Restricted Note.
How It Works
- View notes they have permission to access.
- Reply to notes they are permitted to interact with.
- Export notes they are authorized to view.
Where to Find It
- Work Items
- Work Orders
- Communications
- Request Details
- Request Exports
- Board Configuration
- Employee Access Settings
- Open a Work Item or Request.
- Add or manage an external participant (Board, Union Employee, or Owner).
- Configure Notes Visibility settings where applicable.
- View, reply to, or export notes.
- Verify that only authorized notes are displayed and available for interaction.
Benefits
- Stronger protection of private and sensitive information.
- Consistent note visibility behavior across all modules.
- Reduced risk of unauthorized access through exports or participant interactions.
- Better control over communications involving external participants.
- Improved compliance with privacy and access-control requirements.
Screenshot

Important Notes
Clear Custom Days
Past State
What’s New
How It Works
Where to Find It
To access it:
- Open the Create Calendar or Edit Calendar page.
- Navigate to the Custom Days section.
- Click Clear Custom Days and confirm the action.
Benefits


Important Notes
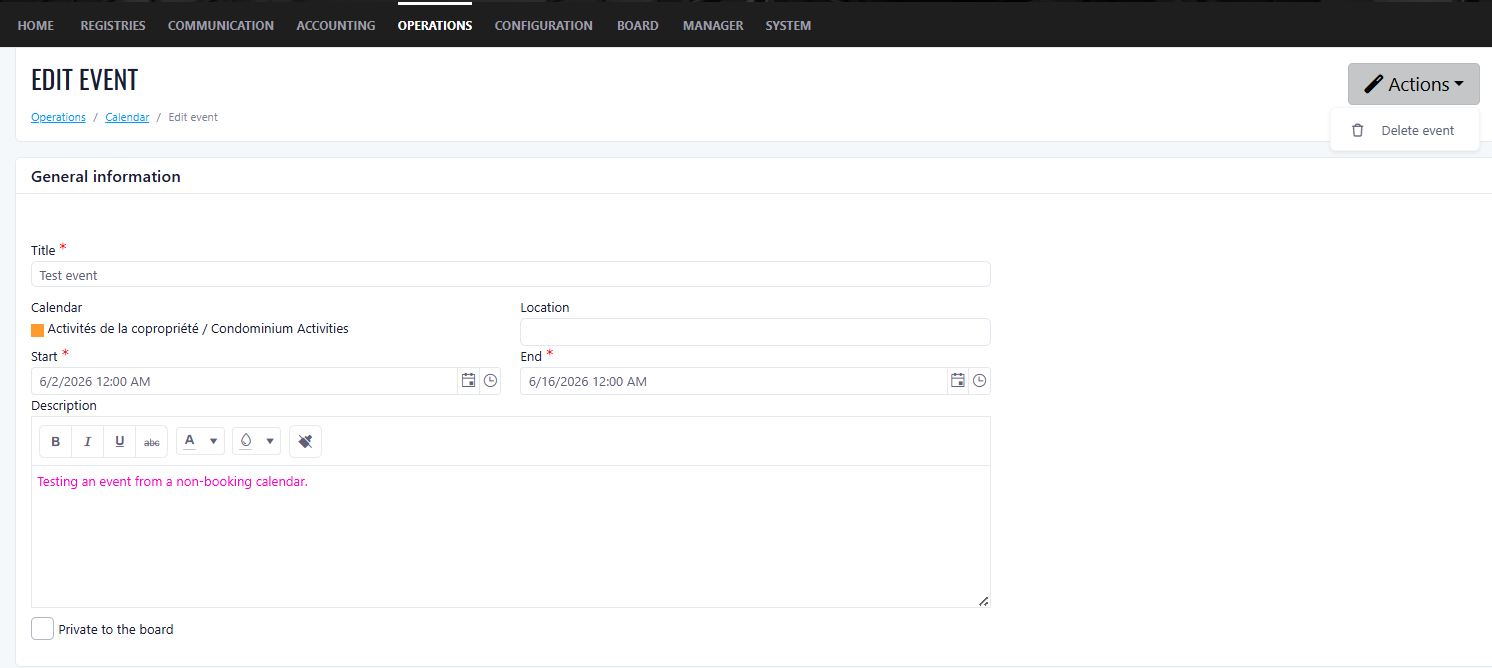
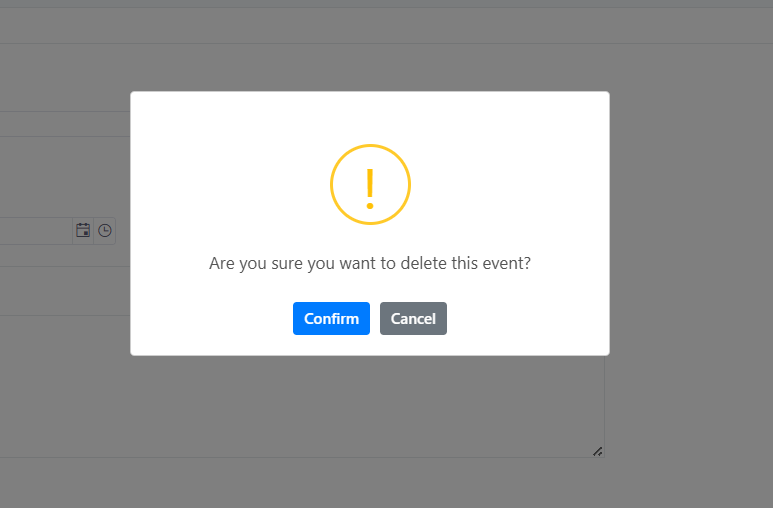
Delete Calendar Events
Past State
What’s New
How It Works
Where to Find It
To access it:
- Open the Calendar.
- Select an existing event from a non-booking calendar.
- Open the event edit page and click Delete.
Benefits
Important Notes
Third Week Of The Month
New Features
Improvements
Last Week Of The Month
New Features
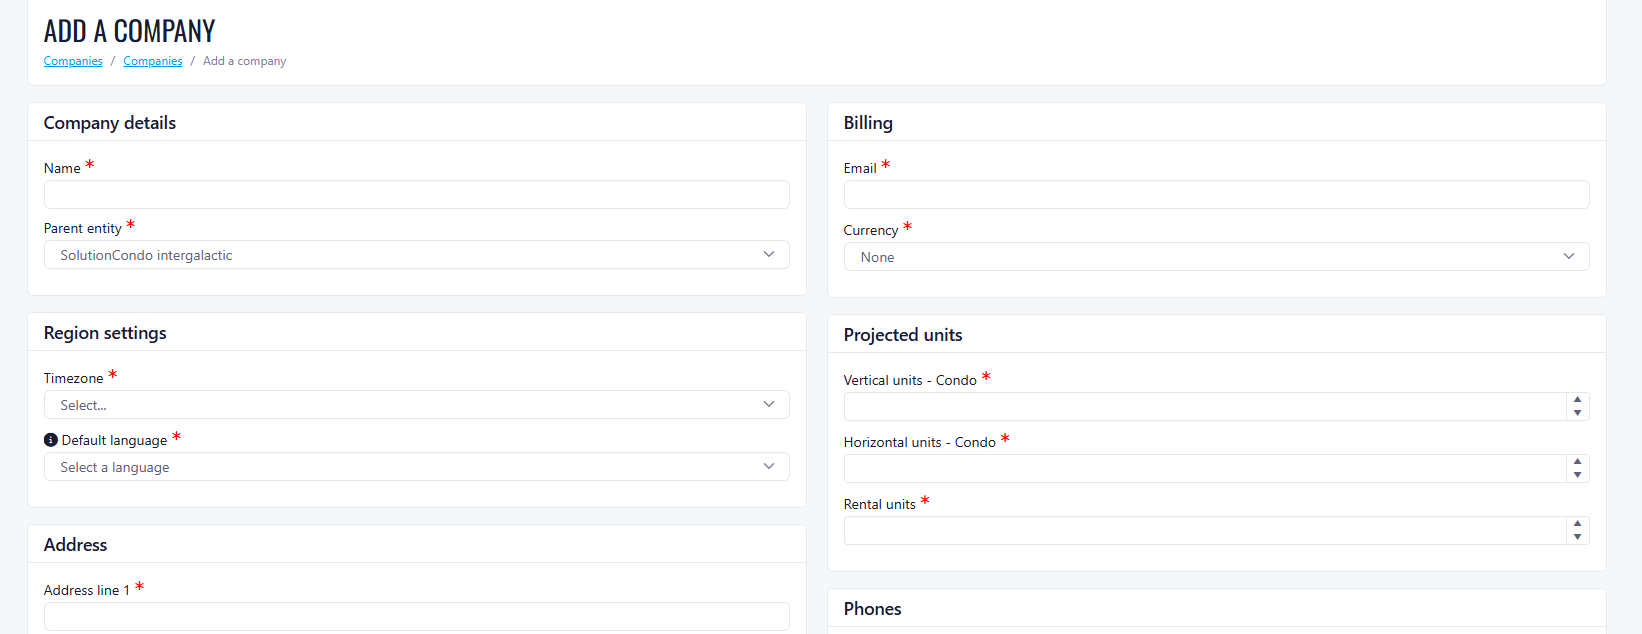
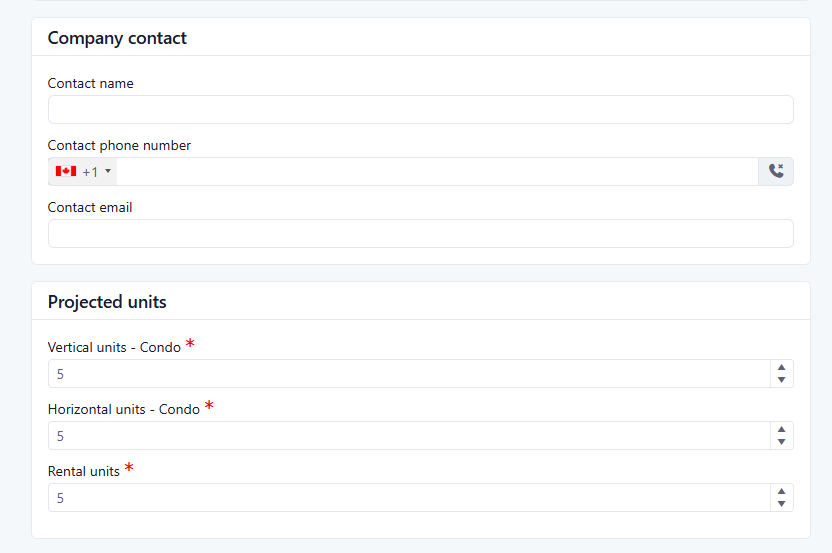
Projected Units Tracking During Company Creation
What's New
- A new Projected Units section has been added to the Company Creation page.
- Administrators can now enter projected unit counts for:
- Condo H (Horizontal)
- Condo V (Vertical)
- Rental
- All three fields are now required during company creation (a value of 0 is accepted).
- The Time Zone field no longer defaults to the first available option and now requires an explicit user selection.
How It Works
Where to Find It
- Navigate to the Admin section.
- Select Companies.
- Click Create Company.
Benefits
- Improves visibility into projected onboarding volumes.
- Provides more accurate planning and tracking of company growth.
- Reduces configuration errors by requiring explicit time zone selection.
Important Notes
- Projected Unit fields are mandatory, but users may enter 0 when a unit type does not apply.
- A Time Zone must be selected before a company can be created.
External Participant Notes Visibility & Privacy Controls
Past State
What's New
- Notes visibility permissions are now consistently enforced across the platform.
- External participants can only view notes that are permitted by their visibility settings.
- External participants can only reply to notes they are authorized to access.
- Visibility behavior now applies to all supported participant types, including:
- Board Members
- Union Employees
- Owners
- Exported requests now respect note visibility permissions.
- Notes that are not accessible to a user will not appear in exported files.
- Privacy controls have been standardized across Work Items, Communications, and Request Exports.
- When note type selection is unavailable, users can only create or reply using a Restricted Note.
How It Works
- View notes they have permission to access.
- Reply to notes they are permitted to interact with.
- Export notes they are authorized to view.
Where to Find It
- Work Items
- Work Orders
- Communications
- Request Details
- Request Exports
- Board Configuration
- Employee Access Settings
- Open a Work Item or Request.
- Add or manage an external participant (Board, Union Employee, or Owner).
- Configure Notes Visibility settings where applicable.
- View, reply to, or export notes.
- Verify that only authorized notes are displayed and available for interaction.
Benefits
- Stronger protection of private and sensitive information.
- Consistent note visibility behavior across all modules.
- Reduced risk of unauthorized access through exports or participant interactions.
- Better control over communications involving external participants.
- Improved compliance with privacy and access-control requirements.
Screenshot
Important Notes
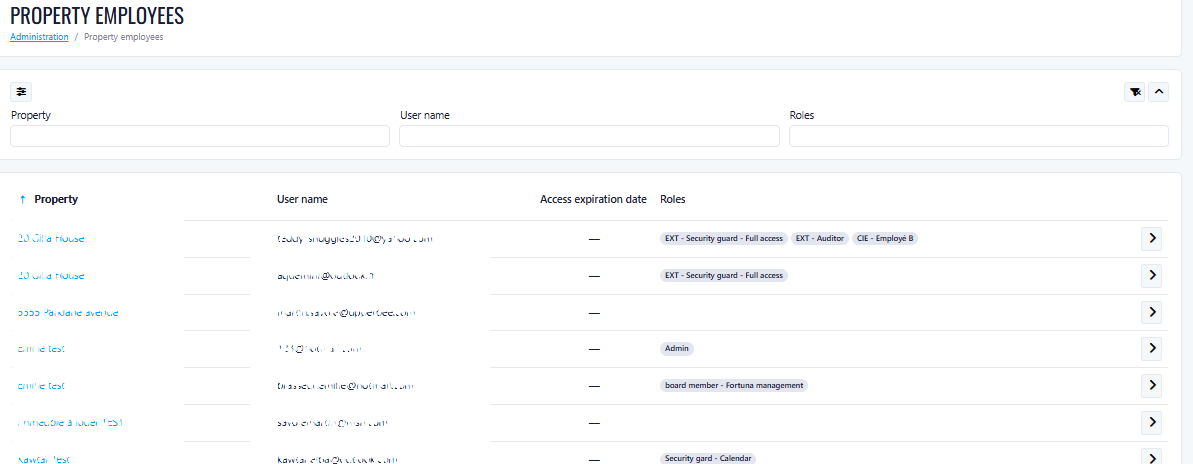
Property Employee Report
How It Works:
- Property
- Username
- Access Expired On
- Roles
Where to Find It
To Access It:
- Navigate to the Company section.
- Open the Administration Summary page.
- Select Property Employee Report.
Past State
What's New / What's Changed:
- Added a new Property Employee Report page at the company level.
- Added a shortcut to the report from the Administration Summary page.
- Displays employee information including Property, Username, Access Expired On, and Roles.
- Allows direct navigation to the employee management page by selecting a report row.
Benefits:
- Provides a consolidated view of all property employees across managed syndicates.
- Improves efficiency when locating employee access and role information.
- Simplifies employee management through direct access to employee records.
Important Notes:
Was this article helpful?
That’s Great!
Thank you for your feedback
Sorry! We couldn't be helpful
Thank you for your feedback
Feedback sent
We appreciate your effort and will try to fix the article