Release Notes
First Week Of The Month
New Features
AI-Assisted Resident Insurance Validation (BETA)
This release introduces AI-Assisted Resident Insurance Validation, designed to streamline the insurance submission and renewal process while maintaining support for the existing manual workflow.
Past State
Previously, residents uploaded their insurance policy documents and managers manually reviewed the information. There was no automated extraction of policy details, no validation step before submission, and no automatic approval when no changes were detected.
What’s New
- Added a new minimum civil liability coverage amount setting.
- Introduced a two-step submission process for insurance policies and renewals.
- Added AI-based extraction of insurance information from uploaded documents.
- Displays extracted information to the resident for validation before final submission.
- Automatically approves the insurance policy when no information has changed.
- Stores AI-extracted data in a JSON field in the database.
- Highlights fields that were manually modified by the resident in the manager approval screen.
- Displays the required minimum civil liability coverage amount in the approval popup.
- Warns residents when the submitted policy does not meet the minimum civil liability requirement.
- Updated the visual interface according to the new design mockups.
How It Works
Step 1
Upload the insurance document
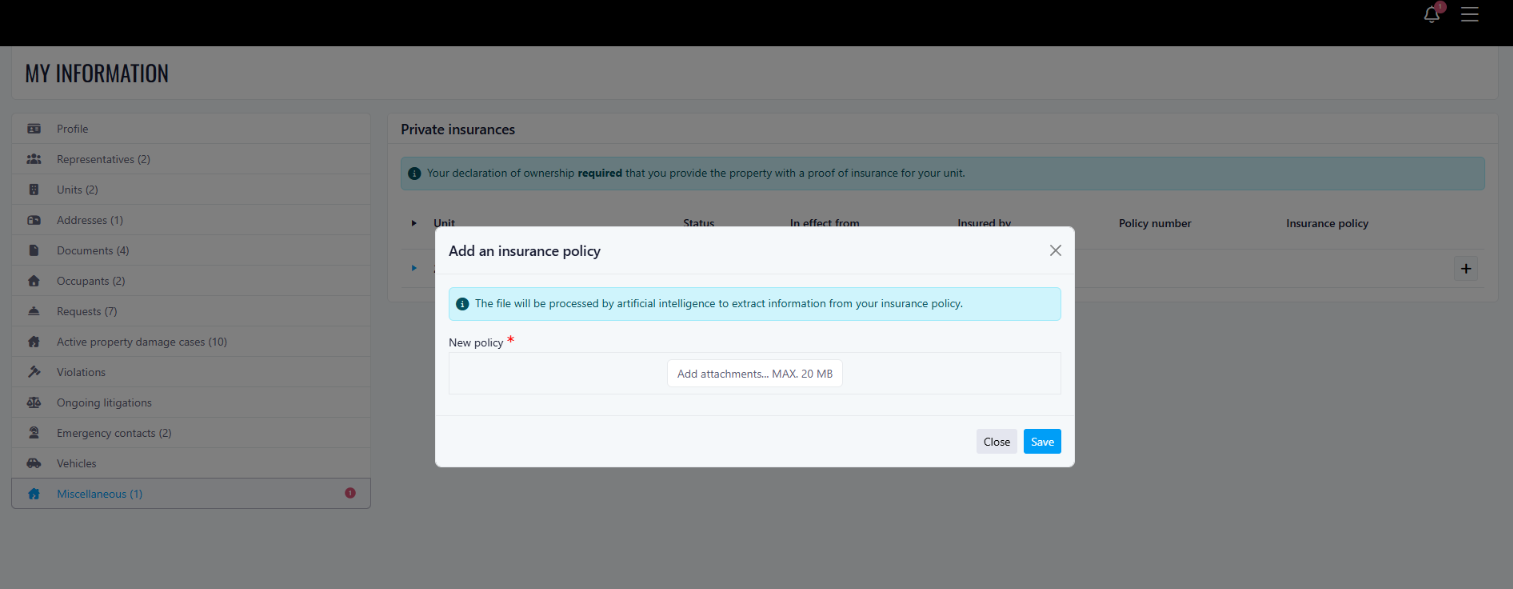
- The resident uploads a new or renewed insurance policy document.
Step 2
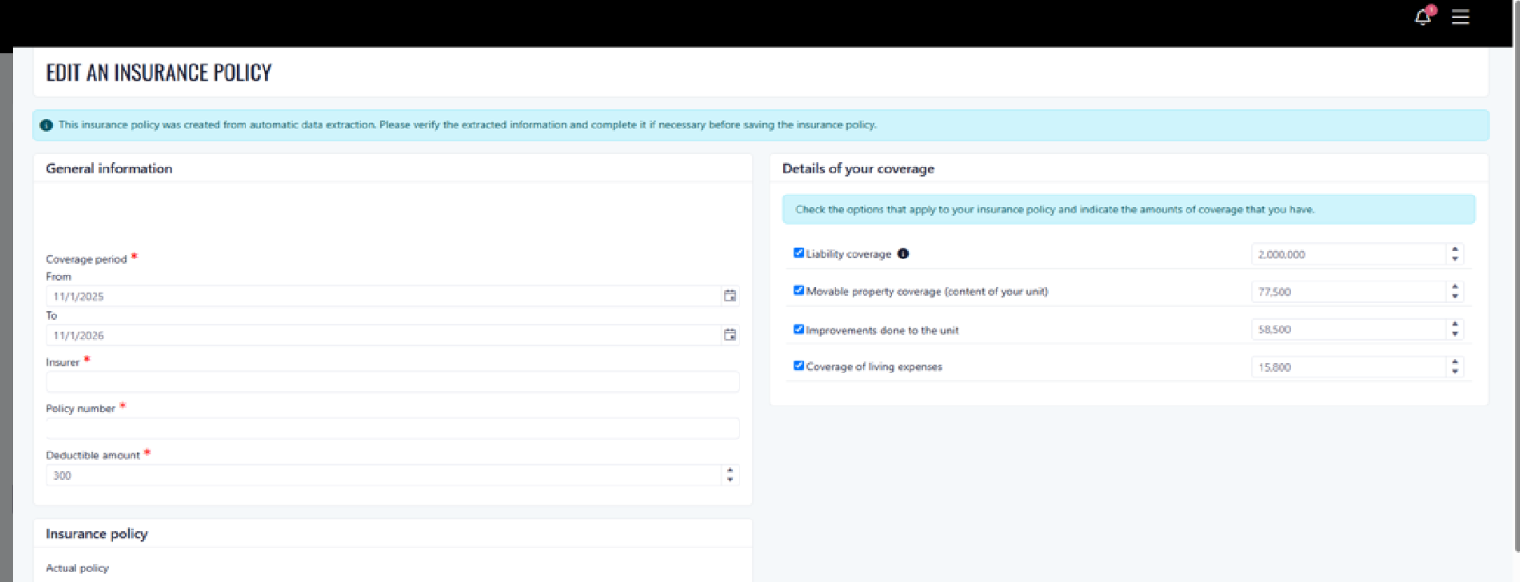
Validate extracted information
- The AI extracts the required policy information.
- The extracted fields are displayed to the resident for review.
- The resident can confirm or manually adjust the information before submission.
Automatic Approval
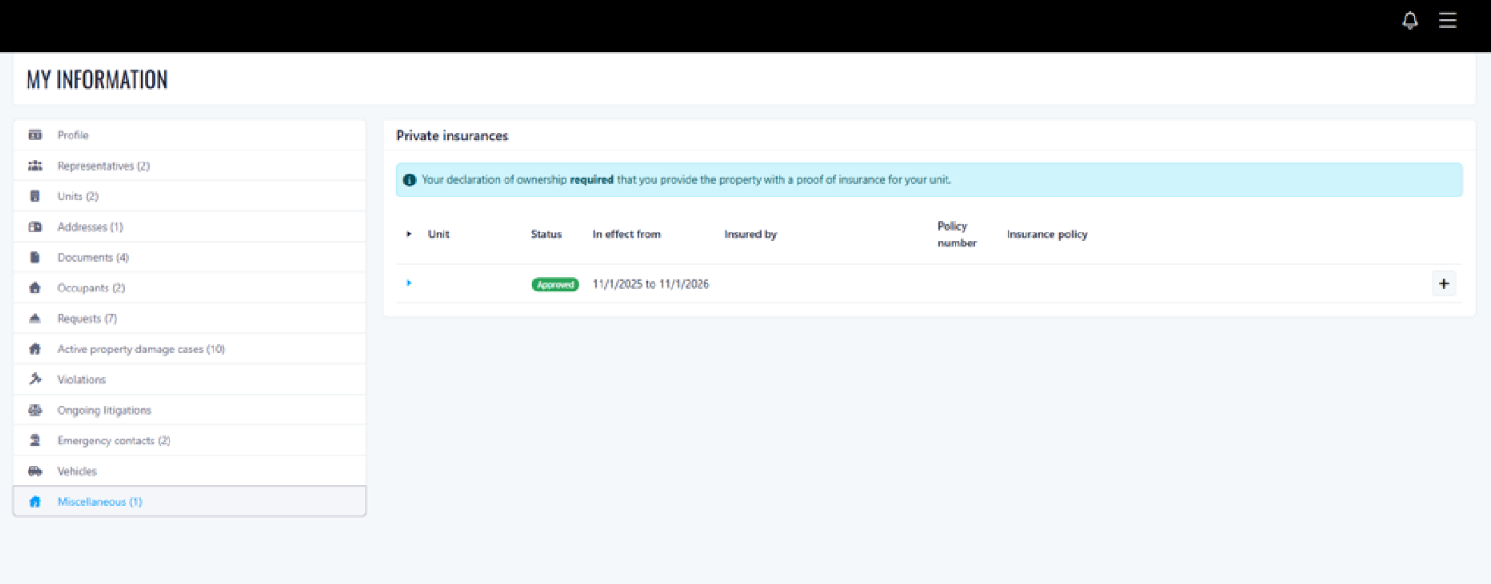
- If the submitted information matches the previously approved data, the policy is automatically approved.
Manager Review
- Managers can see which fields were modified manually by the resident.
- The expected minimum civil liability coverage amount is clearly displayed.
Where to Find It
You can find this feature in:
- Resident Insurance Submission / Renewal screens
- Insurance Settings
- Manager Insurance Approval screen
To access it:
- Go to Settings.
- Configure the minimum civil liability coverage amount.
- Submit or renew a resident insurance policy.
Benefits
- Reduces manual data entry and review time.
- Improves accuracy of insurance information extraction.
- Provides clearer validation and compliance checks for civil liability coverage.
Important Notes
- The AI extraction functionality is controlled by a feature gate.
- The manual submission process remains fully functional when AI is disabled.
- AI-related billing is not included in this release.
- Residents will receive a warning if their policy does not meet the configured minimum civil liability coverage requirement.
Improvements
Add decimals to share percentage
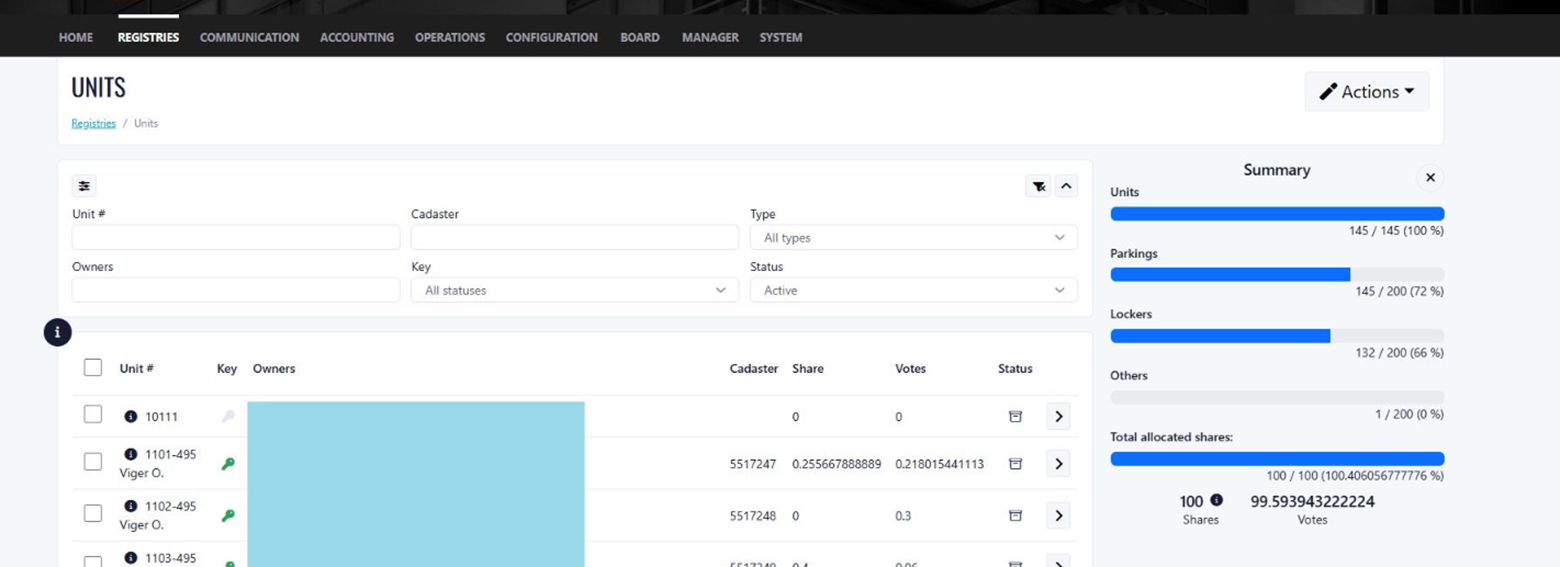
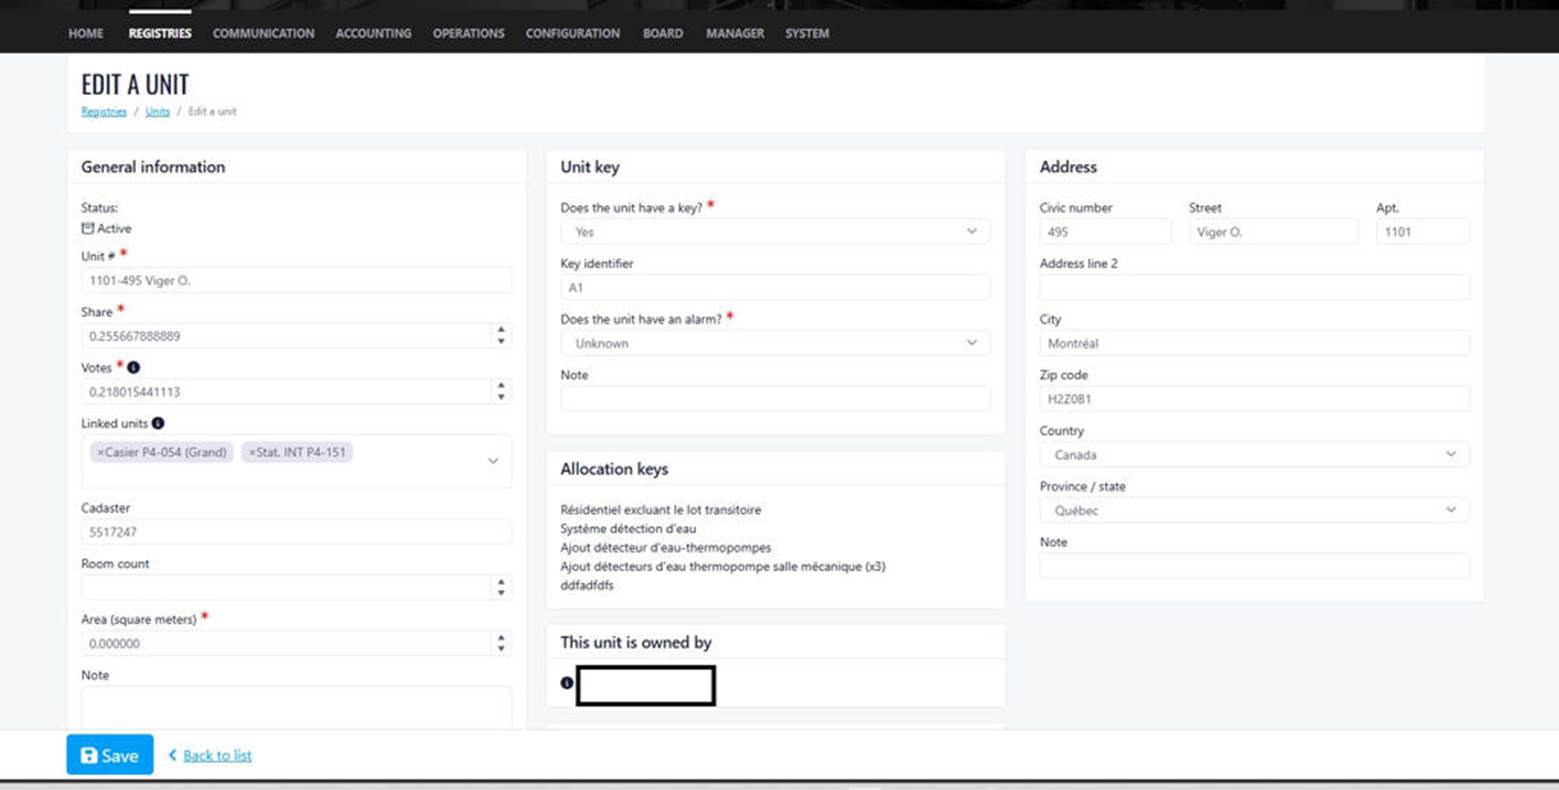
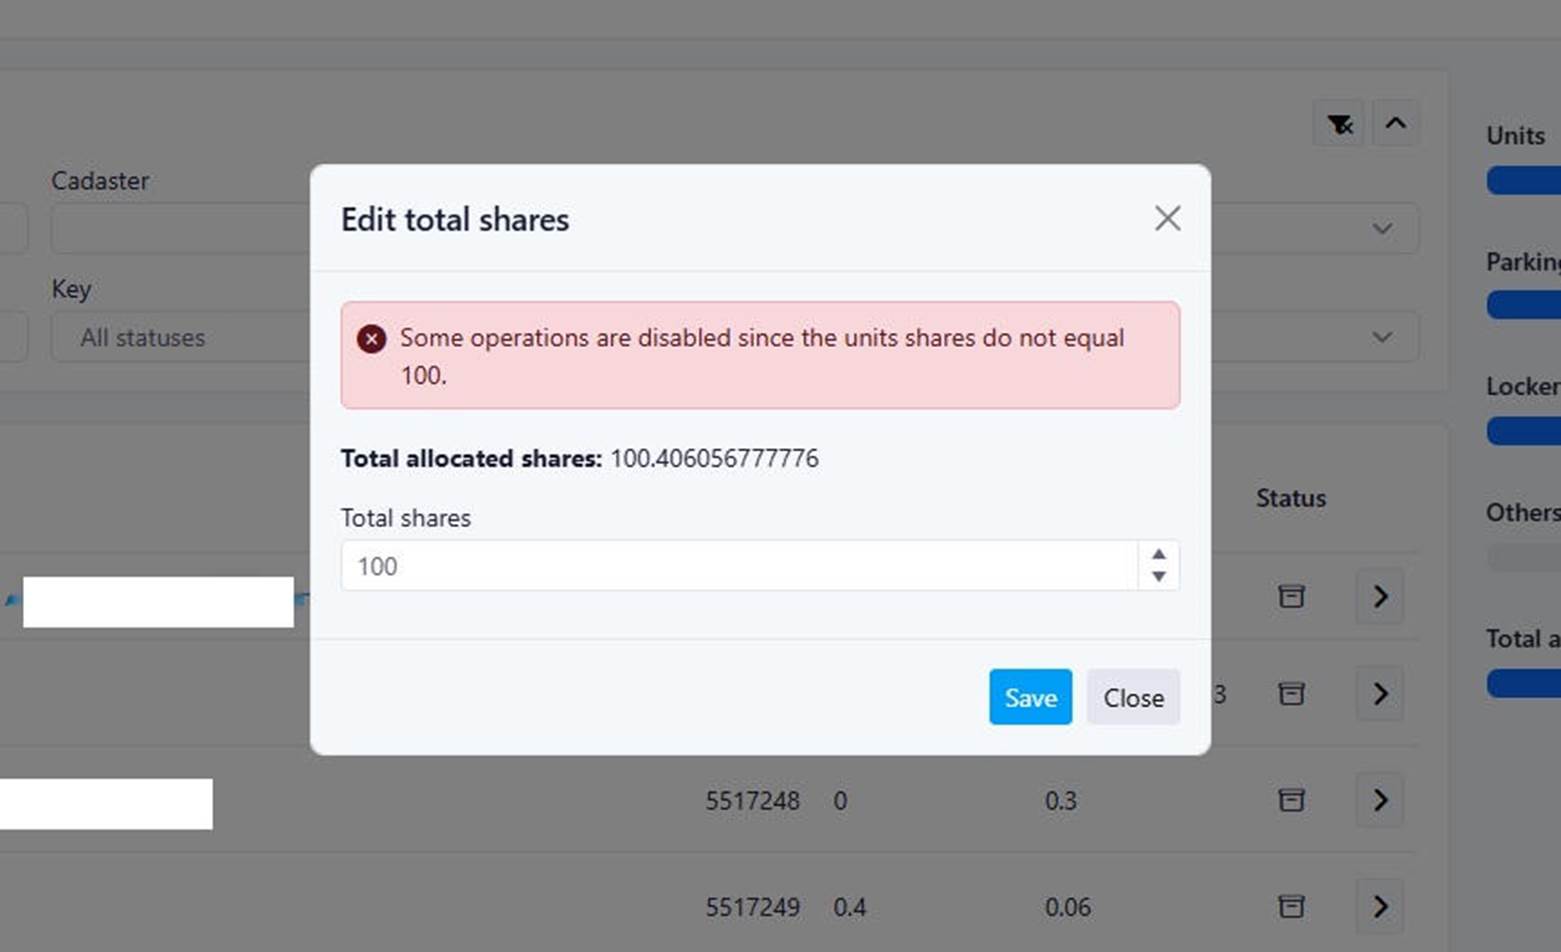
This release introduces a new enhancement increased decimal precision for unit shares and voting allocations, enabling more accurate distribution across spaces with very small ownership percentages.
This enhancement provides greater flexibility and accuracy when managing unit allocations and voting rights, particularly for properties requiring highly granular ownership distribution.
Past State
Previously, unit shares and voting percentages could only support up to 6 decimal places.
What’s New
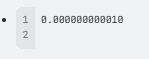
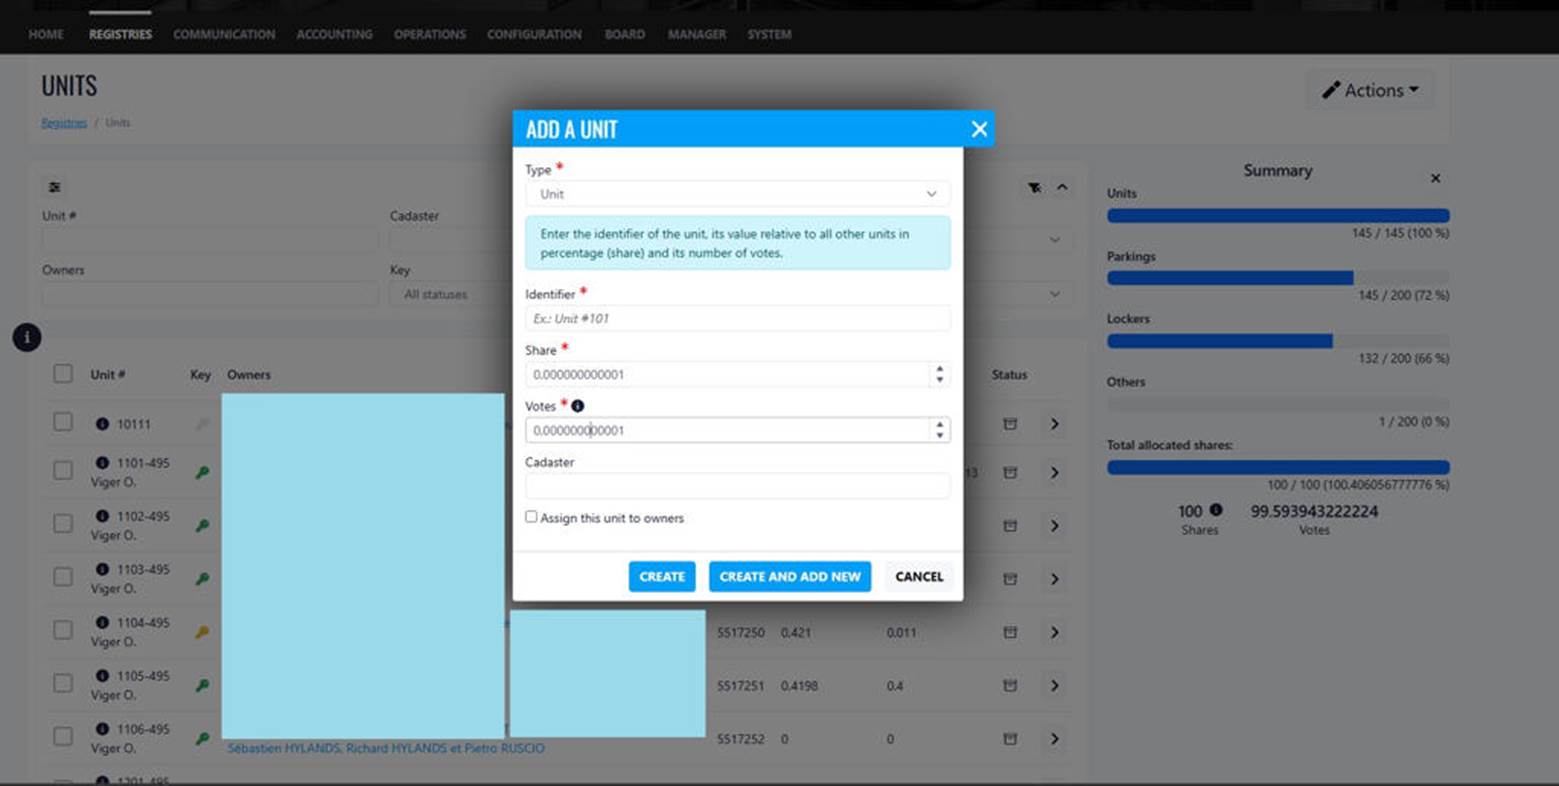
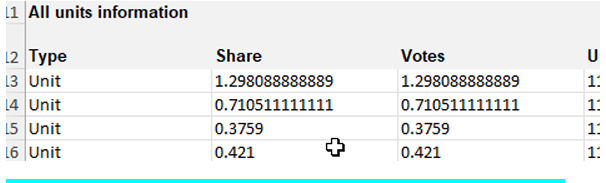
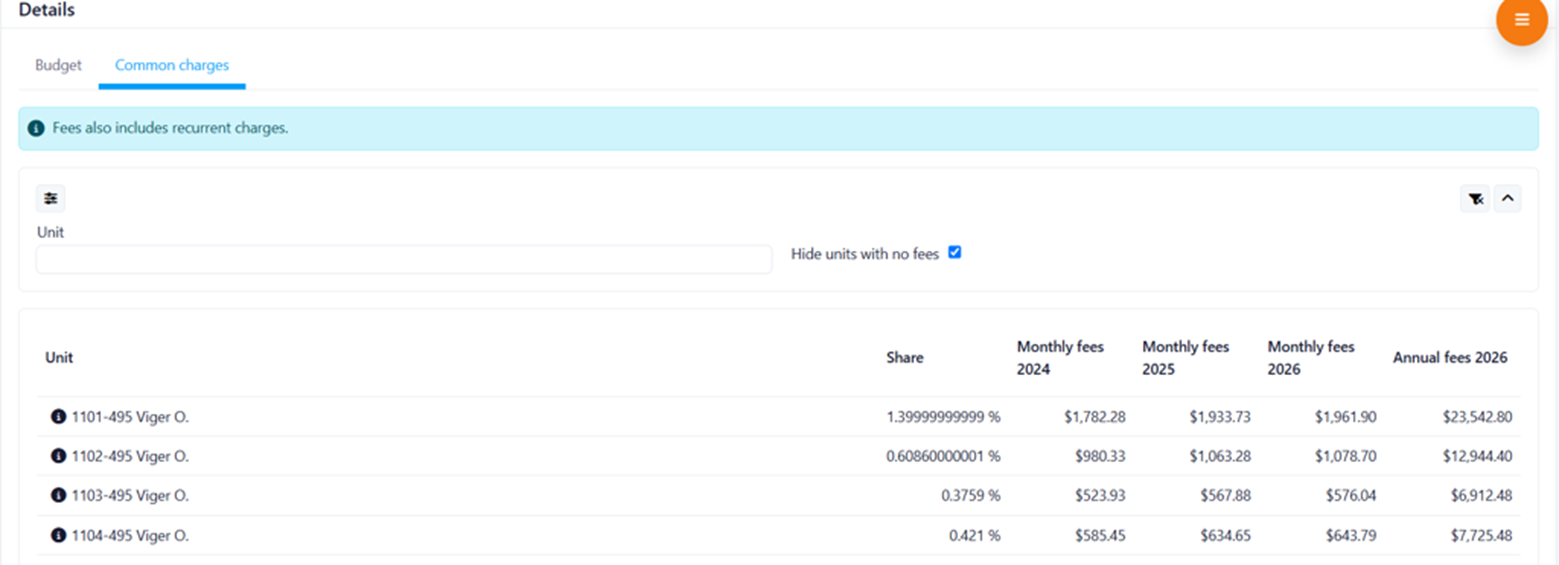
Unit shares and voting percentages can now support up to 12 decimal places instead of the current limit of 6 decimal places. This allows smaller spaces to be assigned a more precise share when required.
How It Works
The enhanced precision is available when:
- Entering values manually in the application.
- Importing data through an Excel file.
Example
Previous maximum precision: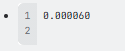
New maximum precision:
Where to Find It
You can find this feature in: Registries (units) and Accounting (budgets)
To access it:
- Registries / Units (of different type: unit, parking, locker, other)
- Registries / Units / Add a unit
- Registries / Units / Eddit total shares
- Registries / Units / Edit a Unit
- Registries / Units / Unit details
- Accounting / Budgets / Budget (year) / Common charges
Benefits
- Greater flexibility
- Greater accuracy
Screenshots
Configurable Advance Deposit Slip Notification for UpperBee Pay
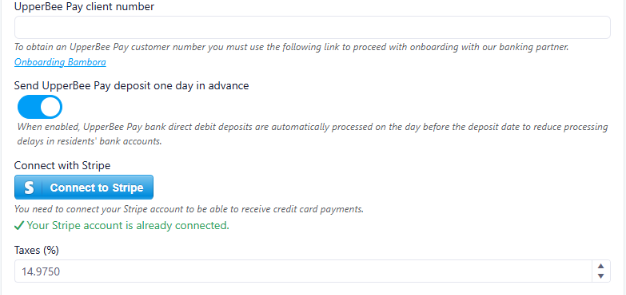
This release introduces a new company setting that allows administrators to enable or disable the advance deposit slip notification for UpperBee Pay PPA deposits.
Past State
Previously, deposit slips for UpperBee Pay PPA deposits were always sent one day before the deposit was processed. This prevented users from modifying or cancelling a scheduled deposit the day before it was withdrawn.
What's New
A new company setting has been added to enable or disable the one-day advance deposit slip notification. By default, this setting is enabled for all companies.
How It Works
When the setting is enabled, deposit slips are sent one day before the scheduled UpperBee Pay PPA deposit. When disabled, the advance notification is not sent.
Where to Find It
You can find this feature in: Configuration > Company Settings
To access it:
- Go to Configuration.
- Open Company Settings.
- Enable or disable the Advance Deposit Slip Notification setting.
Benefits
- Provides greater flexibility for company administrators.
- Allows more time to modify or cancel scheduled deposits.
- Helps reduce complaints related to early deposit processing.
Important Notes
- This setting only applies to UpperBee Pay PPA deposits.
- The setting is enabled by default for all existing and new companies.
Second Week Of The Month
New Features
Residents Feedback Dashboard Update
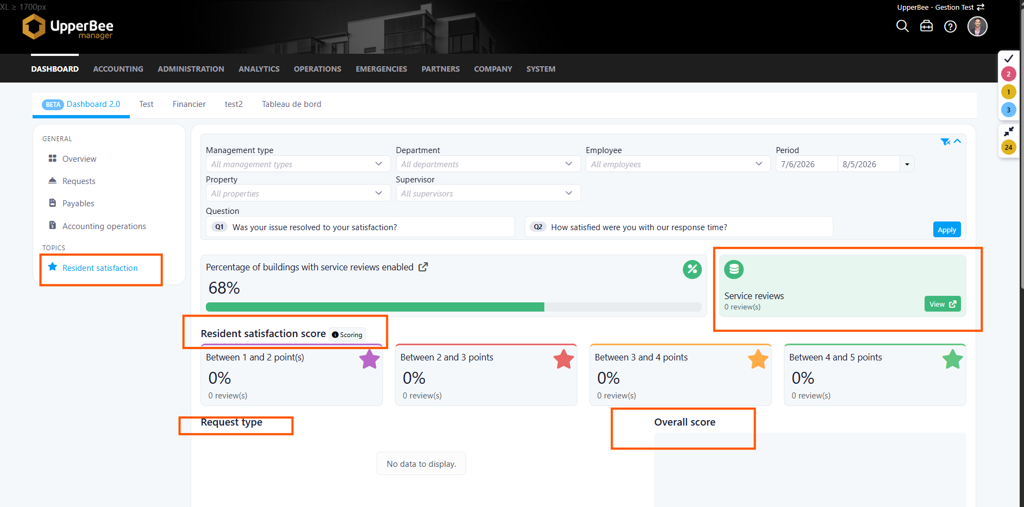
This update focuses on improving the clarity and usability of the Residents Feedback Dashboard through content refinements and the addition of a new service evaluation feature.
Past State
Previously, the wording of the titles and subtitles were lacking clarity and usability.
What’s New
Updated Titles and Subtitles
-
Revised dashboard titles and section headings for improved readability.
-
Updated subtitles to provide clearer context and enhance user navigation.
-
Standardized naming conventions across dashboard pages and visualizations.
New Service Review Section
-
Added a dedicated Service Review section.
-
Provides a centralized view of resident feedback related to service quality and satisfaction.
-
Enables stakeholders to quickly identify service performance trends and areas for improvement.
How It Works
The feature flow and behavior of the dashboard stays the same, but with improved clarity and usability.
Where to Find It
You can find this feature in: /company/9/dashboard/servicereviews
To access it:
-
Select the “Resident satisfaction” dashboard access in the employee profile.
-
On the dashboard page, select Resident satisfaction under “Topics” on the left side menu.
Benefits
-
Improved user experience through clearer labeling and navigation.
-
Better support for data-driven decision-making and continuous service improvement.
Screenshots
Clickable Request Number Hyperlink
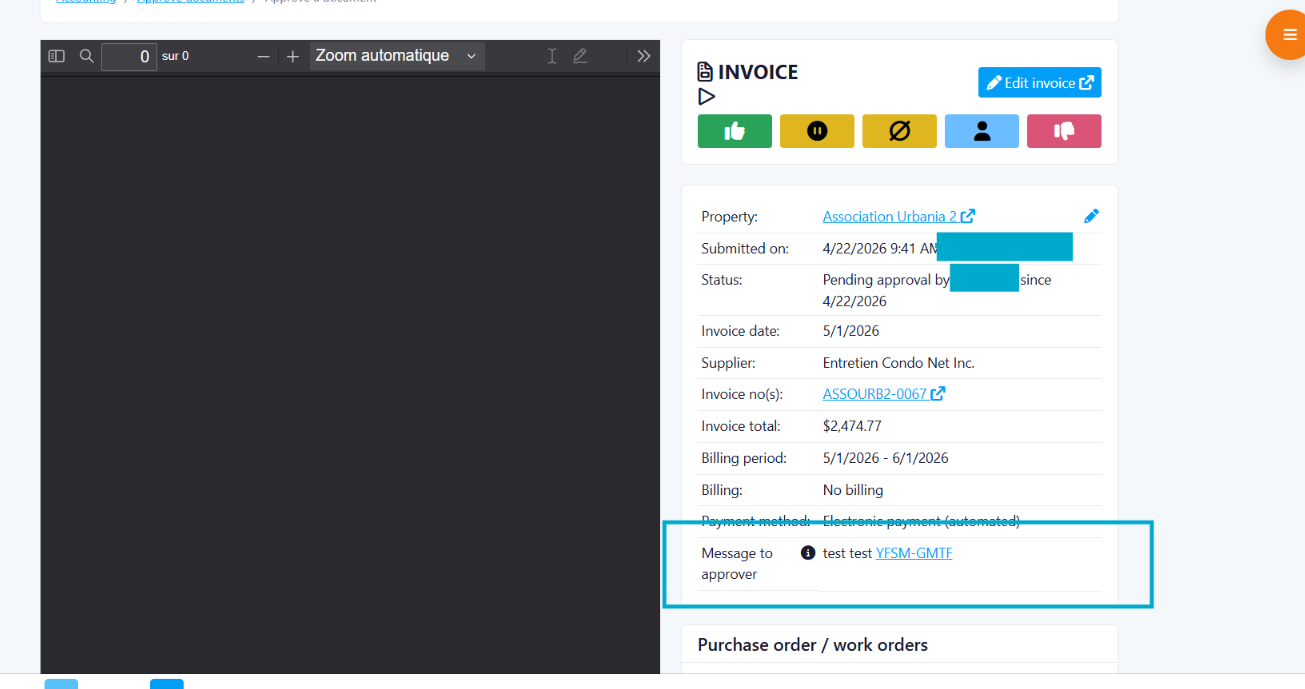
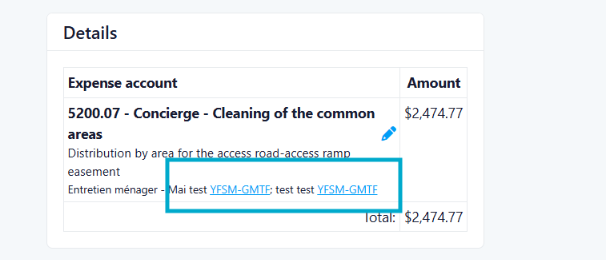
This enhancement automatically converts request numbers into clickable hyperlinks on the Approve a Document page. Approvers can now access the related request directly, making invoice tracking, validation, and review more efficient.
Previous Behavior
Previously, users had to copy the request number and perform a manual search in the system to view the request details. This extra step added time and reduced the efficiency of the approval process.
What's New
Request numbers entered in the Message to Approver and Invoice Description fields are now automatically converted into hyperlinks. With a single click, users can open the corresponding request directly.
How It Works
When a request number is entered in either the Message to Approver or Invoice Description field, it is automatically converted into a clickable link that directs users to the related request.
Where to Find It
Accounting > Approve Documents > Approve a Document
How to Access It
-
From the Accounting menu, select Approve Documents.
-
On the Approve Documents page, open a document to access the Approve a Document page.
-
Click a request number displayed in the Message to Approver or Invoice Description fields to open the related request directly.
Benefits
-
Time Savings: Instantly access the related request without performing a manual search.
-
Improved Efficiency: Streamlines invoice analysis and approval by providing quick access to relevant information.
-
Better User Experience: Reduces navigation steps and makes the approval process more intuitive.
Screenshots
Configurable Request Responsibilities for Board Members
This release introduces new configuration options that allow Board members (C.A.) to define which types of communications and requests they are responsible for receiving. This provides greater control over request assignment and notifications while preserving the existing assignment behavior for properties managed by a syndic.
Past State
Previously, requests were generally assigned to the entire Board when no specific assignment was configured. Board members did not have individual settings to indicate which types of requests they were responsible for handling.
Members with the Other role also received requests by default, without an option to opt out of request-related communications.
What's New
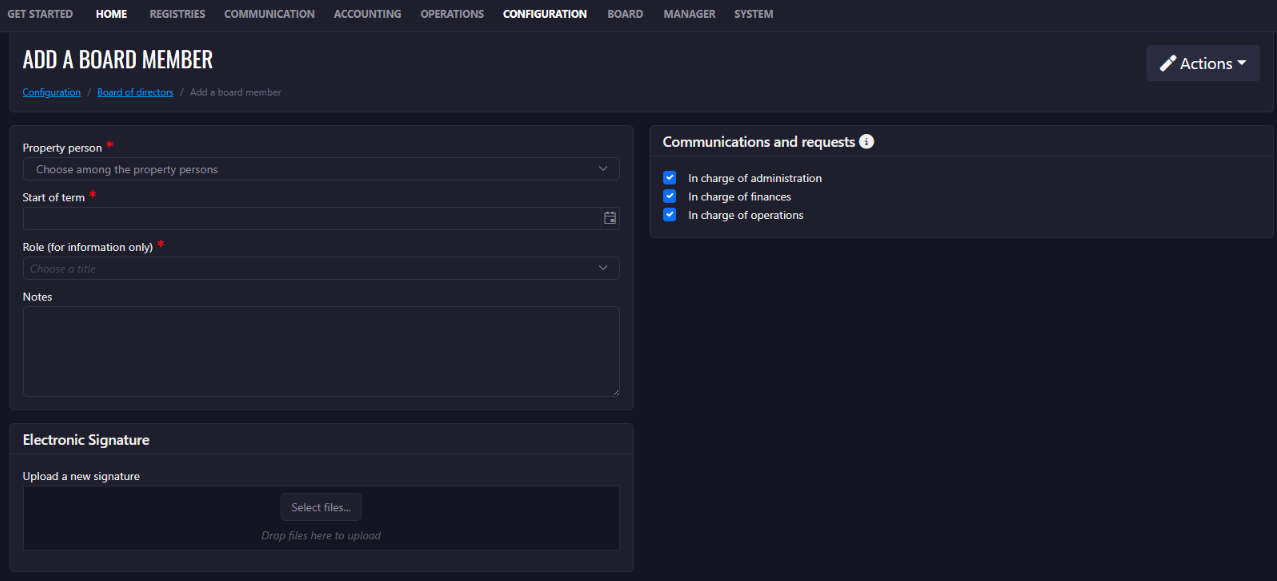
A new section with three checkboxes is available for Board members to define their responsibilities for communications and requests:
-
Administrative
-
Financial
-
Operational
These settings determine which Board member is assigned to the corresponding request types and receives the related notifications.
Additional changes include:
-
Board members with the Other role can now opt out of request communications by leaving all three options unchecked.
-
If no Board member is configured for a specific request type, the request is assigned to the entire Board, as before.
-
The existing request assignment logic for syndicates under management remains unchanged.
-
Existing Board members with the Other role will have all three options unchecked after migration.
-
Existing Board members with other roles will have all three options checked after migration.
-
Board members with the Other role continue to receive communications related to assemblies.
-
Board members with the Other role continue to be included in quorum calculations.
How It Works
Board member request responsibilities can be configured using the three available checkboxes.
For example, a Board member with only Financial selected will receive requests corresponding to the financial responsibility.
If multiple Board members are configured for the same responsibility, the request can be assigned according to the configured assignment logic.
If no Board member is configured for a particular request type, the request is assigned to the entire Board, maintaining the existing fallback behavior.
Board members with the Other role can choose not to receive request communications by leaving all three responsibility options unchecked.
Where to Find It
You can find this feature in: Board Member / C.A. Member Settings
To access it:
-
Open the Board member configuration for the property.
-
Select the appropriate responsibilities under Communications and Requests.
-
Check or uncheck Administrative, Financial, and/or Operational according to the member's responsibilities.
Benefits
-
Allows Board members to clearly define which types of requests they handle.
-
Ensures requests and notifications are directed to the appropriate Board members.
-
Gives Other Board members control over whether they receive request-related communications.
-
Preserves the existing fallback behavior when no specific Board member is configured.
-
Maintains existing assembly and quorum behavior for Other Board members.
Important Notes
For existing Board members, the initial configuration is applied automatically during migration:
-
Other: No responsibilities are selected by default.
-
All other Board member roles: All three responsibilities are selected by default.
Board members with the Other role remain included in quorum calculations and continue to receive assembly-related communications.
The existing request assignment logic for syndicates under management is not affected by this update.
“Certified Email” Option for Sending Request Notes
This update introduces a new Certified Email option that allows users to send request notes with a certified delivery service. This feature can be enabled at the time of sending to obtain confirmation that the message was transmitted and received.
Previous Process
Previously, when users needed to demonstrate that a note had been received by one or more recipients, they often had to rely on screenshots or other manual methods to retain proof of delivery.
How It Works
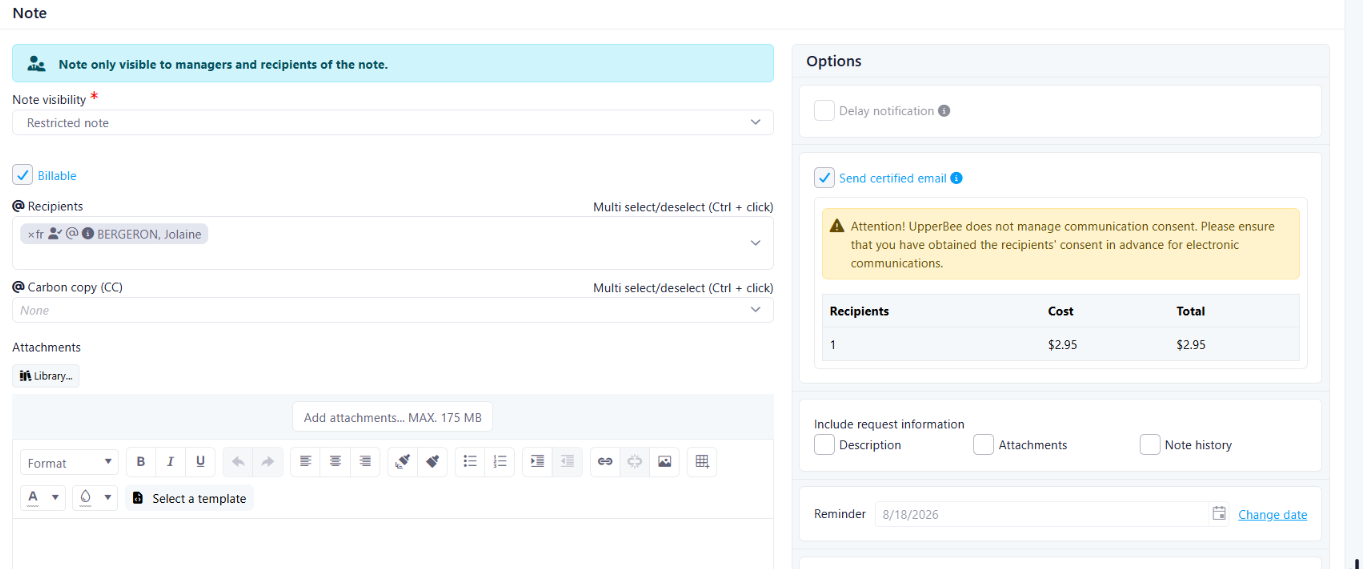
Users can now select the “Send Certified Email” option when sending a note within a service request.
Once enabled, users can:
-
Obtain proof of email transmission and receipt;
-
View the number of recipients included in the delivery;
-
Review the cost associated with sending the certified email before confirming the action.
Where to Find This Feature
You can access this feature from:
Communication > Messages & Requests > Open a Request
Usage Steps
-
From the Communication menu, select Messages & Requests.
-
Open the relevant message or request.
-
In the Note section, locate the Options area.
-
Select the “Send Certified Email” option.
-
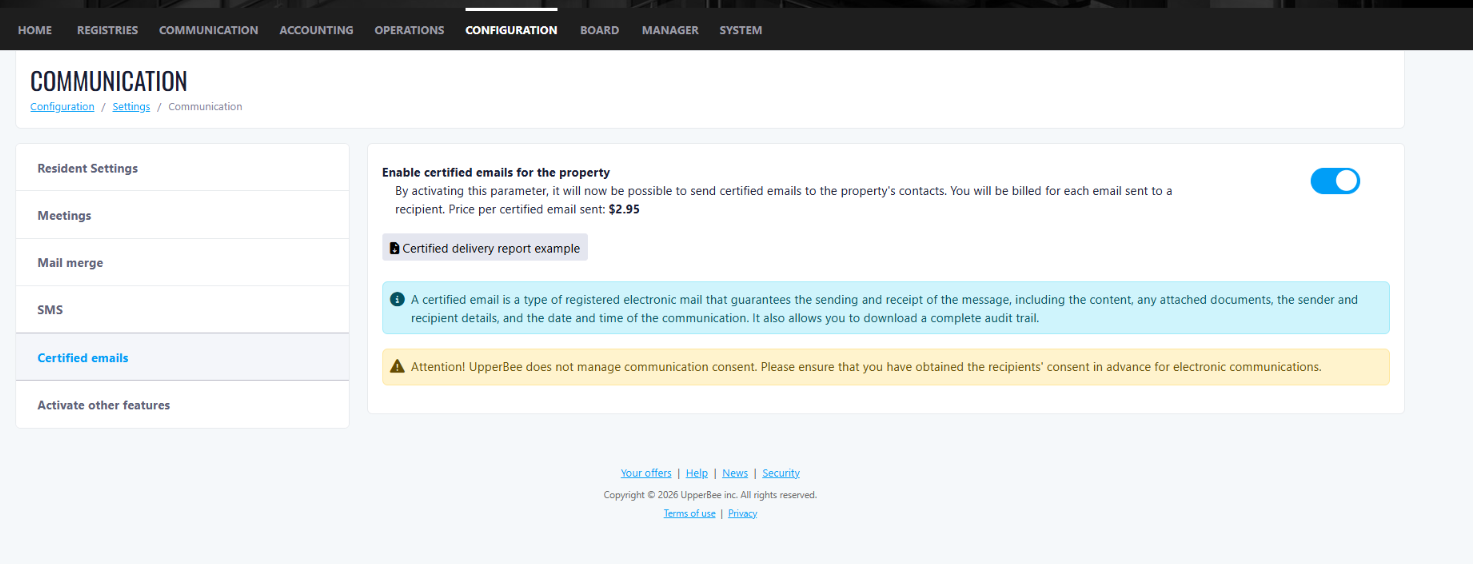
If the Certified Email service has not been configured previously, a setup window will automatically be displayed.
Benefits
1. Enhanced Traceability and Proof of Receipt
Obtain documented confirmation of both message delivery and receipt, making it easier to track communications and maintain compliance requirements.
2. Reduced Manual Effort
Eliminate the need to save screenshots or perform manual follow-ups to demonstrate that a communication was successfully delivered.
3. Greater Visibility into Communications
Quickly view the number of recipients and associated delivery costs before sending, enabling more informed and efficient communication management.

Improvements
New Device Sign-In Notifications
This release introduces new device sign-in notifications, designed to help users identify and monitor access to their accounts and detect potentially unauthorized sign-ins.
Past State
Previously, users were not automatically notified when their account was accessed from a device that had not been previously recognized.
What's New
With this release, users will receive an email notification when a sign-in is detected from a new or unrecognized device.
The notification provides details about the sign-in, including:
-
Date and time
-
Location
-
Device
-
Operating system
-
Browser or application
-
IP address
The email also provides recommendations for securing the account if the activity is not recognized.
How It Works
When a user signs in, the system checks whether the device matches a device previously associated with the user's recent sign-ins.
If a new device is detected, an automated security notification is sent to the user's email address.
The notification allows the user to review the sign-in details and take appropriate action if they do not recognize the activity.
If the sign-in is recognized by the user, no further action is required.
Where to Find It
This feature is automatically triggered when signing in from a new or unrecognized device.
To trigger the notification:
-
Sign in to your account from a device or browser that has not been previously recognized.
-
Complete the sign-in process.
-
Check the email address associated with your account for the new device notification.
Benefits
-
Helps users identify potentially unauthorized access to their accounts.
-
Provides greater visibility into recent account activity.
-
Improves account security by notifying users of sign-ins from unfamiliar devices.
Enhanced General Ledger Options in Financial Report Mail Merge
This release improves the Financial Report Mail Merge by providing more flexibility when generating General Ledger reports. Users can now choose whether to include receivable (unit account) transactions, making reports easier to manage for large properties.
Past State
Previously, the Transaction per Account All report always included receivable (unit account) transactions. For properties with many units, this often resulted in very large reports containing more information than required.
What's New
With this release:
-
Transaction per Account All has been renamed to General Ledger.
-
A new report option, General Ledger Excluding Receivable, has been added.
-
Users can now choose whether to generate a General Ledger report that includes or excludes receivable (unit account) transactions.
How It Works
When creating a Financial Report Mail Merge, users can now select the General Ledger report that best fits their needs:
-
General Ledger – Includes all transactions, including receivable (unit account) transactions.
-
General Ledger Excluding Receivable – Excludes receivable (unit account) transactions, resulting in a more concise report.
Where to Find It
You can find this feature in: Mail Merge > Financial Report
To access it:
-
Navigate to Mail Merge.
-
Create or edit a Financial Report mail merge.
-
Select the desired General Ledger report option.
-
Generate the report.
Benefits
-
Gives users greater control over the content of financial reports.
-
Produces more concise reports for properties with a large number of units.
-
Uses clearer report names that better reflect the report contents.
Important Notes
The previous Transaction per Account All report has been renamed to General Ledger. Existing functionality remains unchanged; the update introduces an additional report option that excludes receivable transactions.
Require a Cheque Specimen for Supplier Banking Information Changes
This release introduces a cheque specimen requirement for supplier banking information changes, designed to improve the validation and security of supplier payment information.
Past State
Previously, users could add or modify a supplier’s banking information without providing a cheque specimen. This made it more difficult for payment approvers to validate the legitimacy of the destination bank account.
What’s New
With this release:
-
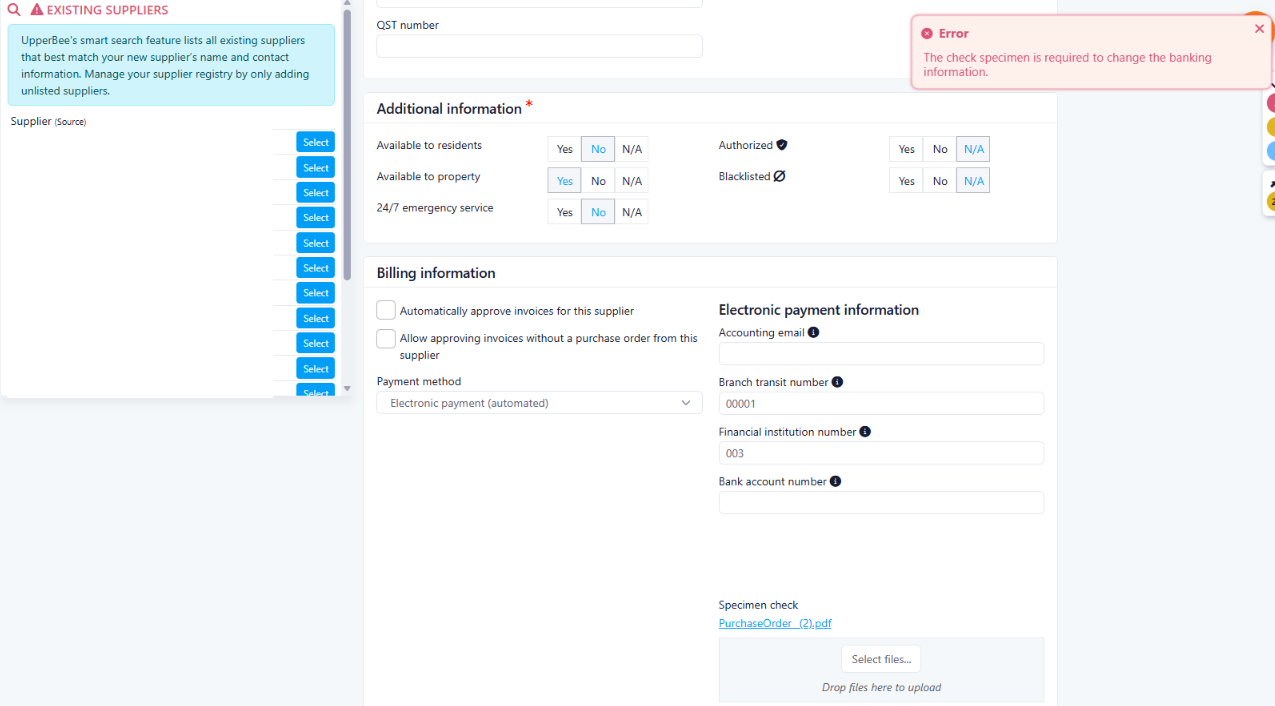
A cheque specimen is required when a supplier’s bank account information is added or modified.
-
The requirement applies when the bank account numbers change. Saving a supplier without changing its banking information does not require a cheque specimen.
-
The cheque specimen is associated with the corresponding banking information and is automatically propagated when banking information is inherited from a company to its child suppliers.
-
The cheque specimen is displayed alongside the bank account information on all payment approval screens.
-
The cheque specimen can be viewed directly from the application instead of being presented as a public download link.
-
Resident suppliers and system suppliers are exempt from the cheque specimen requirement.
-
Existing banking information is not subject to a retroactive cheque specimen requirement.
How It Works
When entering or modifying a supplier’s banking information:
-
Update the supplier’s bank account information.
-
Upload a cheque specimen.
-
Save the changes.
-
The banking information and cheque specimen are saved together.
If the bank account information is changed without providing a cheque specimen, the changes cannot be saved and the user is notified that a cheque specimen is required.
When banking information is managed at the company level, the cheque specimen is automatically propagated along with the banking information to the applicable child suppliers.
The cheque specimen is displayed alongside the transit, institution, and account numbers on the following payment approval screens:
-
Manager payment approval screen
-
CA payment approval screen
-
Offline payment approval page
For the offline approval page, the cheque specimen is accessed securely through the approval token.
Where to Find It
You can find this feature in:
-
Company > Suppliers > Supplier Details
-
Supplier > Supplier Details
-
Payment Approval screens
To access it:
-
Open a supplier’s banking information.
-
Add or modify the bank account information.
-
Upload the required cheque specimen and save the changes.
To review the specimen during payment approval, open the banking information displayed in the payment approval screen and select Cheque Specimen.
Benefits
-
Improved payment security: Provides an additional way to validate the legitimacy of a supplier’s destination bank account.
-
Consistent documentation: Keeps the cheque specimen associated with the corresponding banking information.
-
Simplified management: Company-level banking information and cheque specimens are automatically propagated to child suppliers.
-
Easier approval: Payment approvers can review the cheque specimen directly from the payment approval screens.
Important Notes
-
The cheque specimen is required only when supplier banking information is added or modified.
-
Existing banking information is not subject to a retroactive cheque specimen requirement.
-
Resident suppliers and system suppliers are exempt.
-
If no cheque specimen is available, the payment approval screens will indicate “No cheque specimen on file.”
Notifications for Payment Approval Changes
This release introduces notifications for changes to payment approval settings, helping ensure that approvers are aware when the approval process for a property is modified.
Past State
Previously, changes to an active payment approval process could be made without automatically notifying the existing approvers. This could allow important changes to the approval configuration to go unnoticed.
What's New
With this release, approvers are notified when changes are made to an active payment approval process, including:
-
Payment approval is disabled.
-
Approval parameters are modified.
-
Existing approvers/signatories are removed.
-
New approvers/signatories are added.
To avoid sending unnecessary emails, multiple changes made within the same update are combined into a single notification email.
How It Works
Once payment approval is active for a portal, the system monitors changes to its approval configuration.
When a change is made, the affected approvers are notified by email. The notification provides visibility into the changes made to the approval process.
If several changes are made at the same time—for example, removing one approver, adding two new approvers, and modifying the approval parameters—the system sends one consolidated email rather than a separate email for each change.
This ensures that approvers remain informed without being overwhelmed by multiple notifications.
Where to Find It
You can find this feature in: Payment Approval Settings
To access it:
-
Open the relevant property portal.
-
Navigate to the Payment Approval settings.
-
Enable or configure the payment approval process.
-
Any subsequent changes to the active approval configuration will trigger a notification to the approvers.
Benefits
-
Helps protect established payment approval processes from unauthorized or unnoticed changes.
-
Keeps approvers informed when approval settings are modified.
-
Provides greater visibility into changes that could affect payment authorization.
-
Reduces notification overload by consolidating multiple changes into a single email.
Important Notes
Notifications are only triggered once payment approval is active for the portal.
Multiple changes made as part of the same configuration update are consolidated into a single notification email to avoid sending multiple messages for the same change.
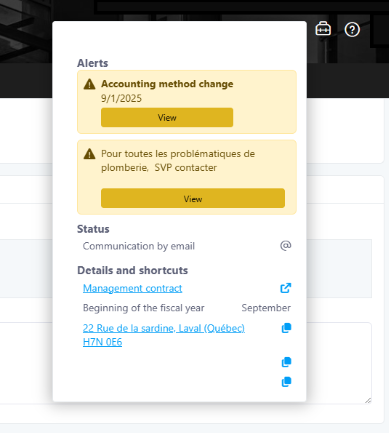
Copy Address for Buildings
This release introduces a quick-copy building address feature, designed to give teams instant access to a building's full civic address without navigating through multiple settings screens.
Past State
Previously, to retrieve a building's complete address, users had to navigate through Configuration → Settings → Profiles, then copy the address information line by line. This process was repeated roughly a dozen times per day for tasks like preparing contracts, scheduling vendor visits, or handling other on-site interventions, resulting in significant repetitive time loss.
What's New
With this release, users can now access and copy a building's full civic address directly from the building's relevant information dropdown menu — the same location where the syndicate's email addresses are found.
How It Works
A new button has been added to the dropdown menu of relevant building information. Clicking it displays (and allows copying of) the building's complete civic address in one step, eliminating the need to dig through profile settings.
Where to Find It:
You can find this feature in: the building's relevant information dropdown menu (next to the syndicate email addresses).
To access it:
-
Open the building's profile or record.
-
Click the relevant information dropdown menu.
-
Select the new "Copy Address" button to instantly copy the full civic address.
Benefits
-
Saves time by eliminating repetitive manual navigation through settings/profiles.
-
Reduces the number of clicks and steps needed to retrieve a building's address.
-
Centralizes address access alongside other frequently used building information (e.g., syndicate emails).
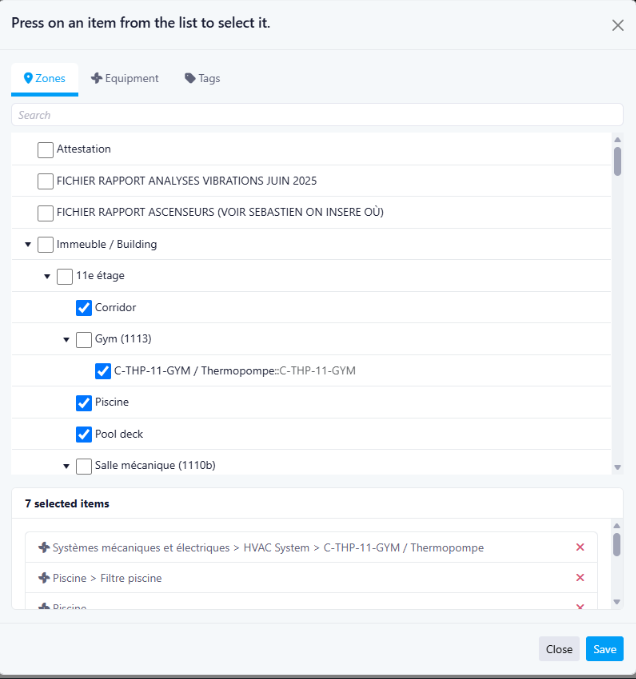
Modernized Property Item Selection Dialog
This release introduces an updated Property Item selection dialog in the Maintenance Log, providing a more modern and consistent user experience across the application.
Past State
Previously, editing Property Items from the Documents section of the Maintenance Log opened an older dialog based on a legacy interface. Its appearance and behavior were inconsistent with the rest of the application.
What's New
With this release, the legacy Property Item dialog has been replaced with the application's modern Bootstrap dialog.
The updated dialog provides a cleaner interface with a consistent layout, controls, and styling that matches the rest of the application.
How It Works
When editing the Property Items associated with a document, the updated dialog opens automatically.
Users can continue selecting or modifying Property Items as before, but now within the new interface.
Where to Find It
You can find this feature in: Maintenance Log > Documents
To access it:
-
Open a Maintenance Log entry.
-
Navigate to the Documents tab.
-
Edit a document by selecting the Edit (pencil) icon.
-
The new Property Item selection dialog will be displayed.
Benefits
-
Provides a modern and consistent user interface.
-
Improves usability by aligning with the application's current design standards.
-
Creates a more seamless experience across different modules.
Important Notes
This update changes only the appearance and user interface of the Property Item selection dialog. Existing functionality and workflows remain unchanged.
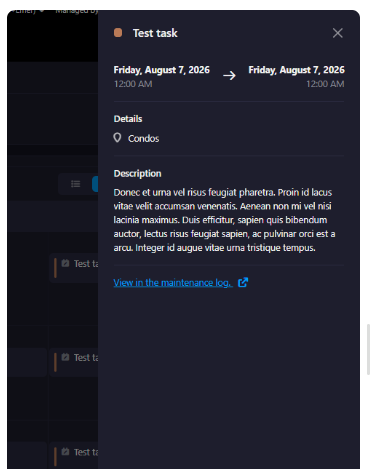
Quick Access to Task Details from the Maintenance Calendar
This release introduces direct access to Task Details from the Maintenance Calendar, designed to help users quickly view all the information required to complete a maintenance task.
Past State
Previously, when users selected a task or a recurring task from the Maintenance Calendar, only limited information was displayed. To view details such as the location, instructions, attachments, assigned users, or recurrence settings, users had to manually search for the task in the Maintenance Log.
What's New
With this release, a View Task Details link is now available when opening a task or recurring task from the Maintenance Calendar.
How It Works
When viewing a task from the Maintenance Calendar, users can select the View Task Details link to open the corresponding Task Details page. From there, they can access complete task information, including:
-
Building and zone/location
-
Task description
-
Instructions
-
Assigned user(s)
-
Recurrence settings
-
Attachments and documents
-
Any other task-related information
Where to Find It
You can find this feature in: Maintenance > Calendar
To access it:
-
Open the Maintenance Calendar.
-
Select a task or recurring task occurrence.
-
Click View Task Details.
Benefits
-
Reduces the time spent searching for maintenance tasks.
-
Provides quick access to all task-related information from the calendar.
-
Improves the maintenance workflow and user experience.
Third Week Of The Month
New Features
Improvements
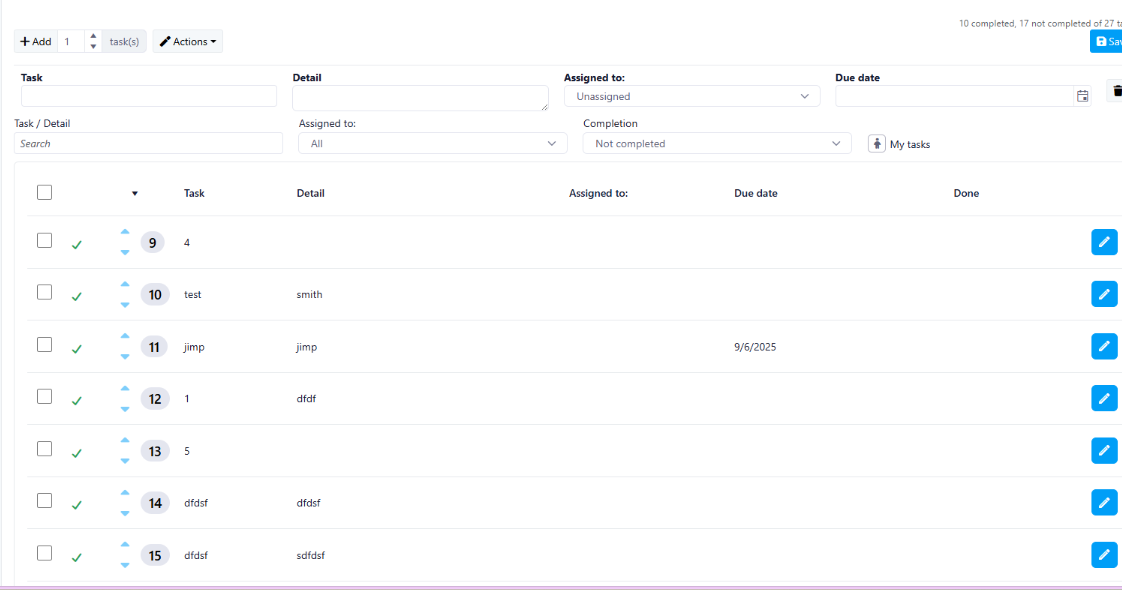
Manual Task Ordering
This release introduces manual task ordering, allowing users to easily control and reorganize the order in which tasks are displayed.
Past State
Previously, users were unable to manually change the order of tasks. The task order could not be adjusted after tasks were created.
What's New
With this release, users can now:
-
View the current Order of each task.
-
Set the order when creating or editing a task.
-
Reorder tasks by clicking and dragging them into the desired position.
-
Create new tasks using the updated task creation window, which includes the Order field.
How It Works
When creating or editing a task, users can see and modify its Order.
The task creation window now includes the following fields:
-
Order
-
Task
-
Detail
-
Assign
-
Due Date
When creating a new task, the user can select an order position. If the existing tasks occupy positions 1, 2, and 3, the new task will automatically be assigned the next available position, #4, and appear at the bottom of the list.
Users can also click and drag tasks to manually move them to a different position, making it easy to reorganize the task list.
Where to Find It
You can find this feature in: Tasks
To access it:
-
Open the Tasks section.
-
Create a new task or edit an existing task.
-
View or modify the Order field.
-
Alternatively, click and drag a task to move it to a different position.
Benefits
-
Gives users direct control over the order of their tasks.
-
Makes it easier to organize tasks according to priority or workflow.
-
Reduces the need to recreate tasks to change their position.
-
Provides a simple drag-and-drop experience for quickly reorganizing tasks.
Last Week Of The Month
New Features
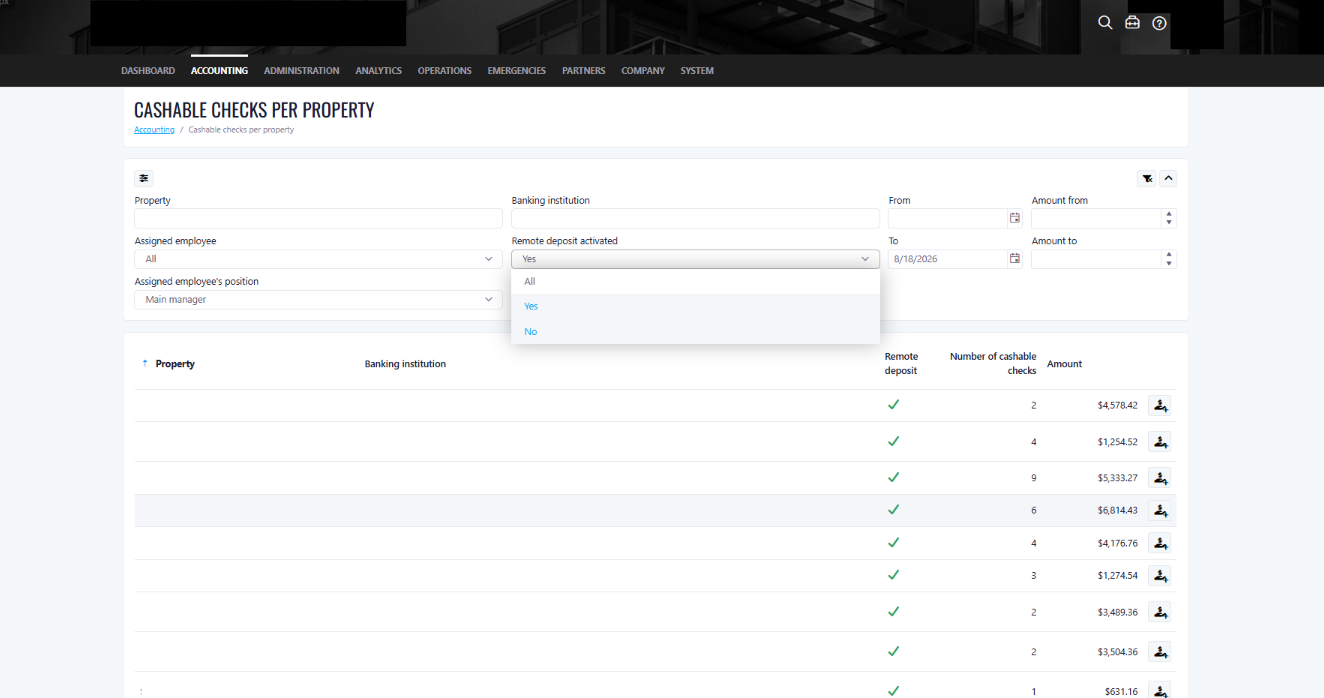
Filter for Cashable Checks by Company
This release introduces a new filter for Cashable Checks by Company, designed to help users quickly identify companies based on whether Remote Deposit is enabled.
Past State
Previously, users had to manually review the list of companies one by one to determine which companies had Remote Deposit enabled.
What's New
With this release, a new Remote Deposit Enabled filter has been added to the Cashable Checks by Company page.
Users can filter the list using the following options:
-
Yes
-
No
How It Works
Users can select whether they want to display companies with Remote Deposit enabled or disabled.
Selecting Yes displays companies for which Remote Deposit is enabled, while selecting No displays companies for which Remote Deposit is not enabled.
This allows users to quickly narrow down the results without manually reviewing each company in the list.
Where to Find It
You can find this feature in: Accounting > Cashable Checks by Company
To access it:
-
Navigate to Accounting.
-
Open Cashable Checks by Company.
-
Use the Remote Deposit Enabled filter.
-
Select Yes or No to filter the results.
Benefits
-
Reduces the time required to review the list of companies.
-
Makes it easier to identify companies with or without Remote Deposit enabled.
-
Improves efficiency when managing cashable checks.
Calendar Redesign
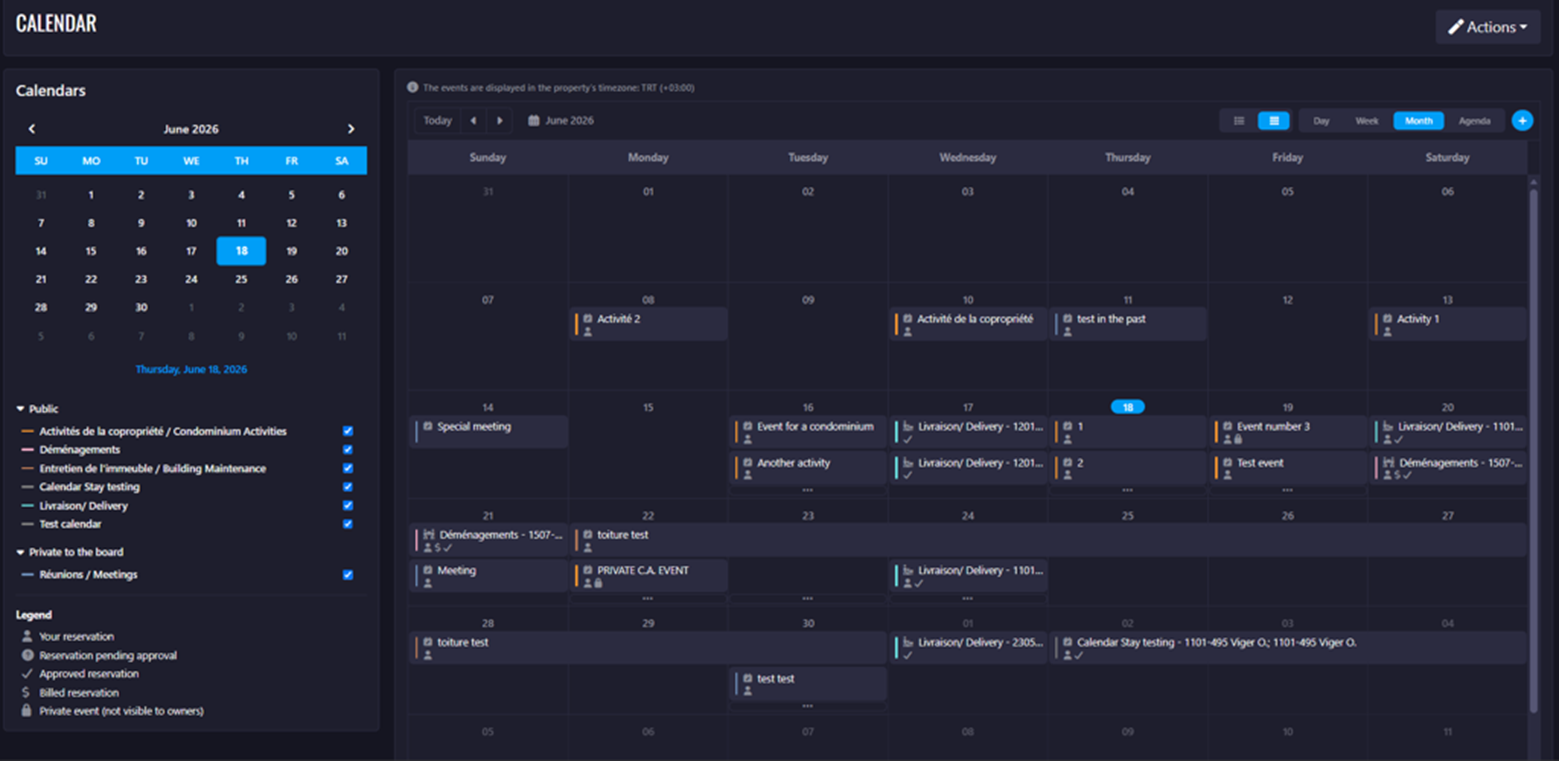
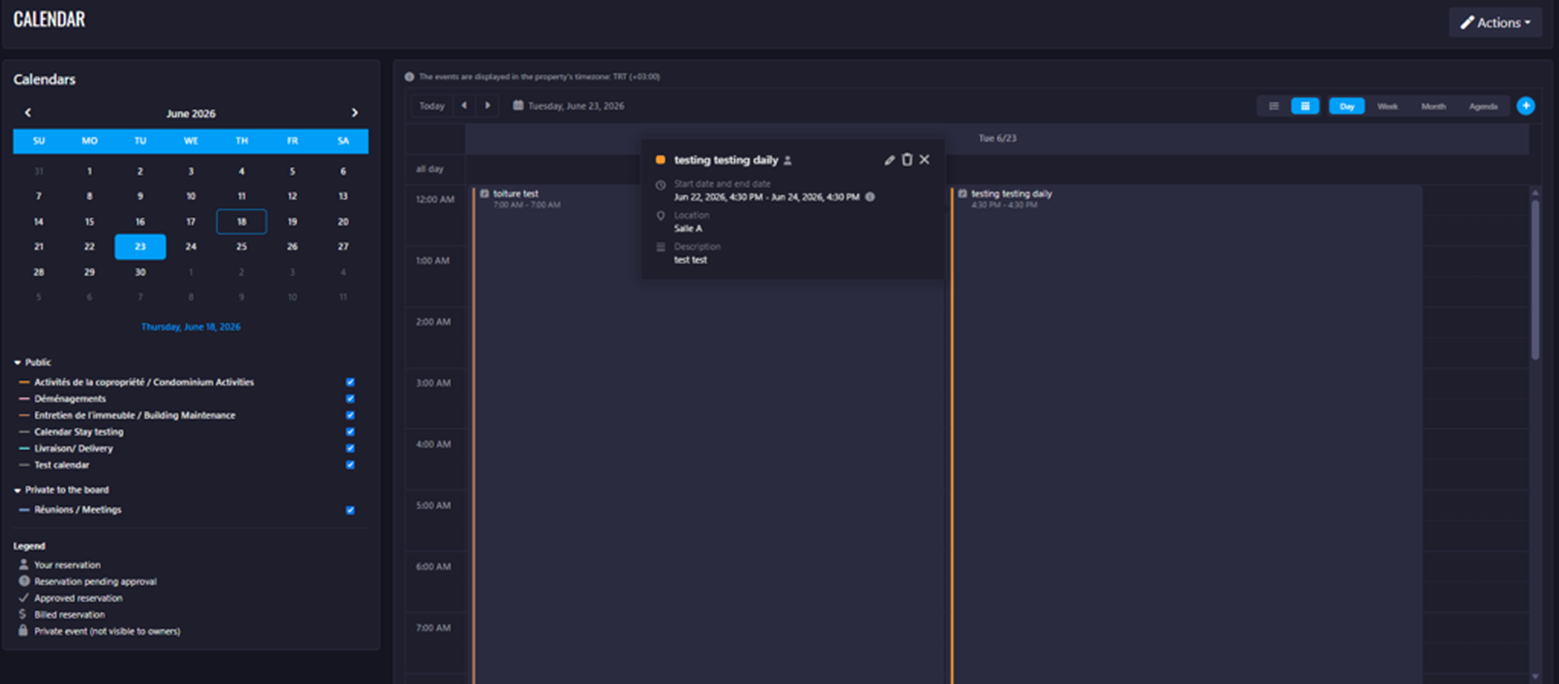
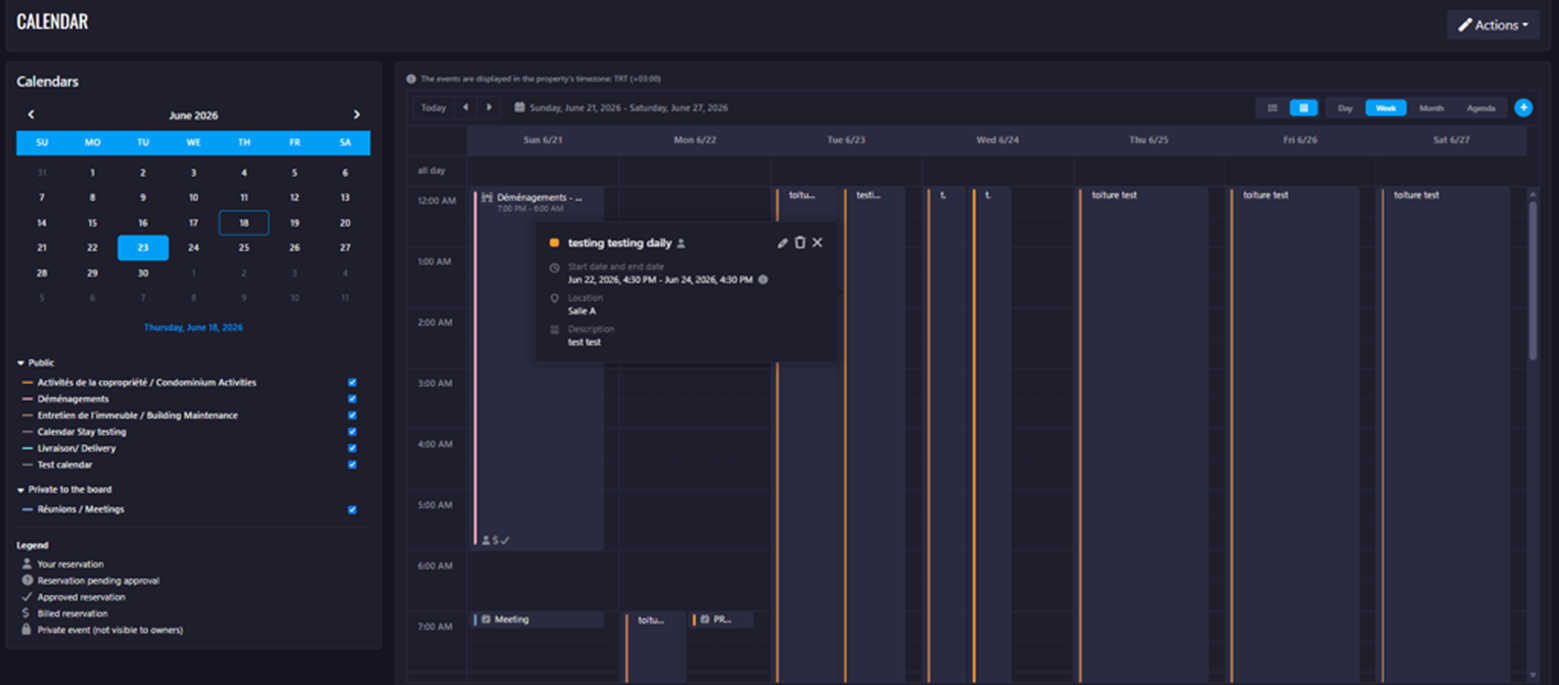
This release introduces a redesigned Calendar experience, designed to improve navigation, reservation management, calendar integrations, and overall usability across desktop and mobile devices.
Past State
Previously, users had limited navigation options, reservation actions were distributed across multiple areas, and viewing multiple reservations on the same date could be challenging. Calendar integrations with Outlook and Google were displayed in a list format, and the overall calendar experience was less intuitive.
What's New
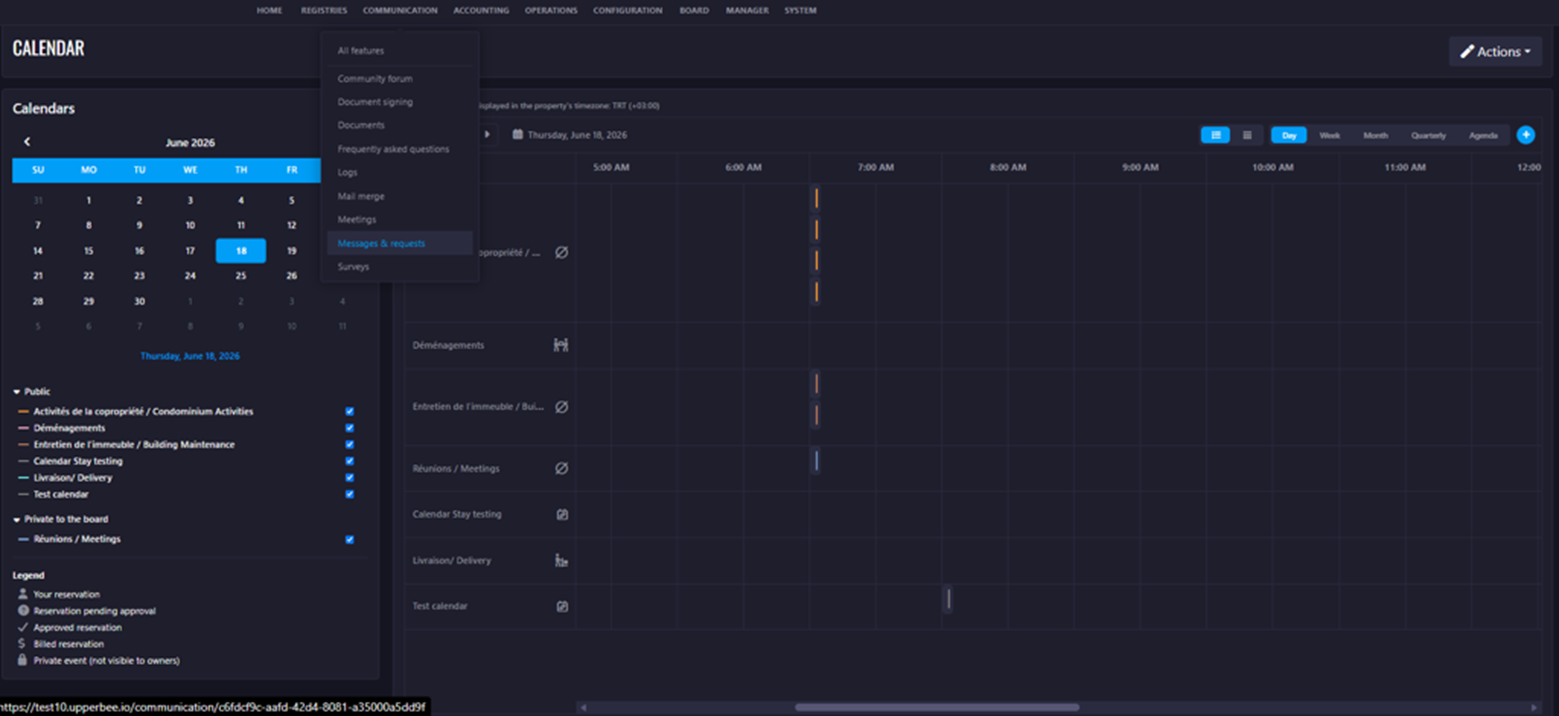
With this release, the calendar has been redesigned with:
- Improved navigation behavior aligned with Microsoft Outlook standards.
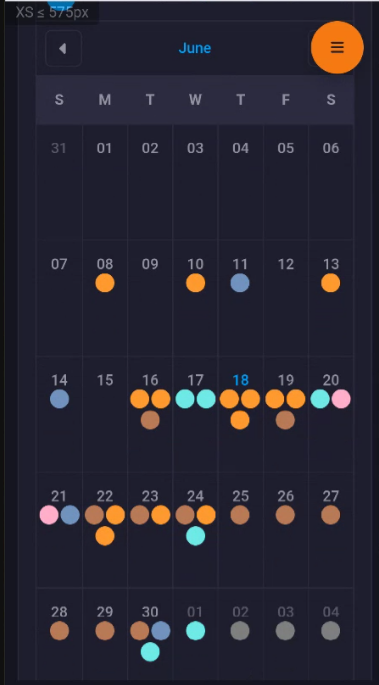
- Enhanced responsive layout for different screen sizes.
- A centralized Action menu for reservation-related tasks.
- Outlook and Google Calendar integrations displayed as tiles instead of lists.
- Expandable views for dates containing multiple reservations.
- Reservation names displayed alongside calendar views.
- Improved reservation interactions, including hover and detailed views.
- A refreshed Agenda view.
- An enhanced Legend displaying reservation colors, icons, and names.
How It Works
Users can navigate through Day, Week, Month, and Agenda views using the calendar controls. Selecting a date from the mini-calendar updates the main calendar according to the active view mode. The new Action button provides quick access to reservation creation, calendar integrations, and printing options. Reservations can be expanded, hovered over for quick details, or opened for complete information.
Where to Find It
You can find this feature in: Reservations > Calendar
To access it:
- Navigate to the Reservations module.
- Open the Calendar page.
- Select your preferred calendar view and begin managing reservations.
Benefits
- Improved navigation and calendar usability.
- Faster access to reservation-related actions.
- Better visibility of multiple reservations and calendar details.
Screenshots
Monthly view:
Daily view:
Weekly view:
Chronological view:
Mobile view:
Important Notes
- Outlook and Google Calendar integrations continue to use the existing synchronization process.
- Agenda functionality remains unchanged; only the visual design has been updated.
- Quarterly View may be available depending on configuration and implementation status.
Improvements
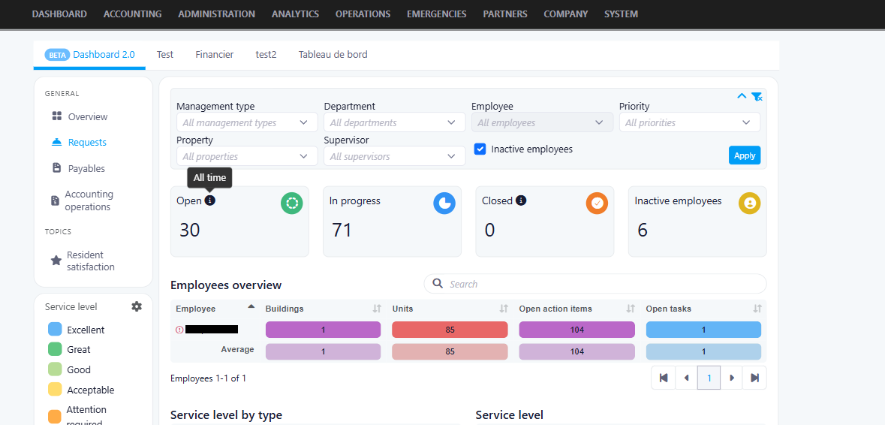
Dashboard Inactive Employees Filter & Enhanced Tooltips
This release introduces a new Inactive Employees Filter to help users quickly identify and review information related to inactive employees. In addition, contextual tooltips have been added throughout the dashboard to improve usability and provide clearer guidance when navigating key features.
How It Works
When the Inactive Employees checkbox is selected, employee-based dashboard results will display only inactive employees who have associated data. This allows users to focus specifically on inactive employee records without manually filtering through active employee data.
Where to Find It
The Inactive Employees Filter is available on the company dashboards, including:
-
Requests
-
Payables
-
Accounting Operations
To Access It
-
Navigate to the Company Dashboard.
-
Open the Requests, Payables, or Accounting Operations section.
-
Locate the Inactive Employees filter beside the Apply button.
-
Select the checkbox and click Apply to view results for inactive employees only.
What's New
-
Added a new filter option to display only inactive employees with available data.
-
Added contextual tooltips across dashboard screens.
Benefits
1. Faster Data Analysis
Quickly isolate and review inactive employee records without manually searching through active employee data.
2. Improved Reporting Accuracy
Enhances visibility into historical employee information, helping users validate and reconcile past transactions more efficiently.
3. Better User Experience
New tooltips provide instant guidance and reduce uncertainty, making dashboard navigation more intuitive and user-friendly.