
Release Notes
First Week Of The Month
New Feature:
AI-Powered Insurance Compliance Management
Overview
This feature helps Property Managers oversee condo insurance compliance through configurable coverage requirements, AI-assisted document extraction, automated reminders, and centralized tracking. Residents upload their insurance documents, review the policy details extracted by AI, and confirm or correct the information. Property Managers retain responsibility for review and approval in V1.
Previous Experience
Residents uploaded insurance documents and entered or confirmed coverage information. Property Managers reviewed submissions and sent reminders, while expirations, missing documents, and review exceptions were harder to monitor in one place.
What's New
- Property Managers can configure liability, unit contents, unit improvements, and living-expense coverage, with separate requirements for owners and tenants.
- Each coverage type can be marked Required, Recommended, or N/A. Required coverage has a configurable minimum amount.
- AI extracts policy details and coverage amounts, pre-fills the resident form, and provides a confidence score for required fields.
- Residents can review and correct extracted values. The system warns when a detected amount is below the configured minimum.
- Property Managers can compare detected amounts with required minimums, review confidence scores and missing fields, open submitted and previous documents, view reminder history, and approve, correct, reject, or request corrections.
- Reminders can be scheduled before and after the due date with selected message templates. The system tracks the last reminder sent and reminder count.
- Insurance tracking adds AI Score and Last Reminder Sent information, status filters, building-level views, and management dashboards with drill-down to buildings and residents.
How It Works
- A Property Manager configures coverage requirements and reminder schedules in Settings > Insurance.
- When insurance is due or expiring, the resident is notified by email or in the platform and uploads the document from the insurance requirement page.
- AI extracts policy details and coverage amounts and pre-fills the form. The resident reviews, corrects if needed, and confirms the information.
- The Property Manager reviews the submission in the Residents Insurances page, checks detected values against the requirements, and approves it or follows up with a correction request.
- Property Managers use the tracking page and dashboards to monitor outstanding actions, expirations, missing documents, reminders, and review exceptions.
Where to Find It
- Settings > Insurance: configure coverage requirements and reminders.
- Insurance requirement page: upload documents and review extracted information as a resident.
- Residents Insurances page and management dashboards: review submissions and monitor compliance.
To Access It
- Configure insurance coverage requirements and reminder schedules in Settings.
- Residents open the insurance requirement page, upload their document, and review the information extracted by AI.
- Property Managers open the Residents Insurances page to review the submission and take the appropriate action.
Benefits
- Reduced manual data entry: AI pre-fills policy details and coverage amounts from uploaded documents.
- Clearer resident follow-up: residents receive due-date reminders and can see when information needs review or correction.
- More focused reviews: Property Managers can see confidence scores, missing values, minimum requirements, and document history together.
- Improved compliance visibility: status filters and dashboards help teams monitor insurance across buildings and follow up on exceptions.
Important Notes
- V1 does not automatically approve insurance documents. A Property Manager must review and approve each submission.
- Missing required values, confidence scores below 90%, resident changes to AI-extracted values, and coverage below the configured minimum are flagged for review.
- Residents can correct a below-minimum amount and submit the form; the submission still goes to a Property Manager for review.
- Certified email reminders are planned for a later version and are not included in V1.
Improvements
Billable Hours Dashboard Enhancements
Overview
This release introduces significant enhancements to the Billable Hours Dashboard, including additional data columns and new summary table charts. These improvements provide greater visibility into billable hour performance, enhance reporting capabilities, and allow users to access key information more efficiently.
Previous Experience
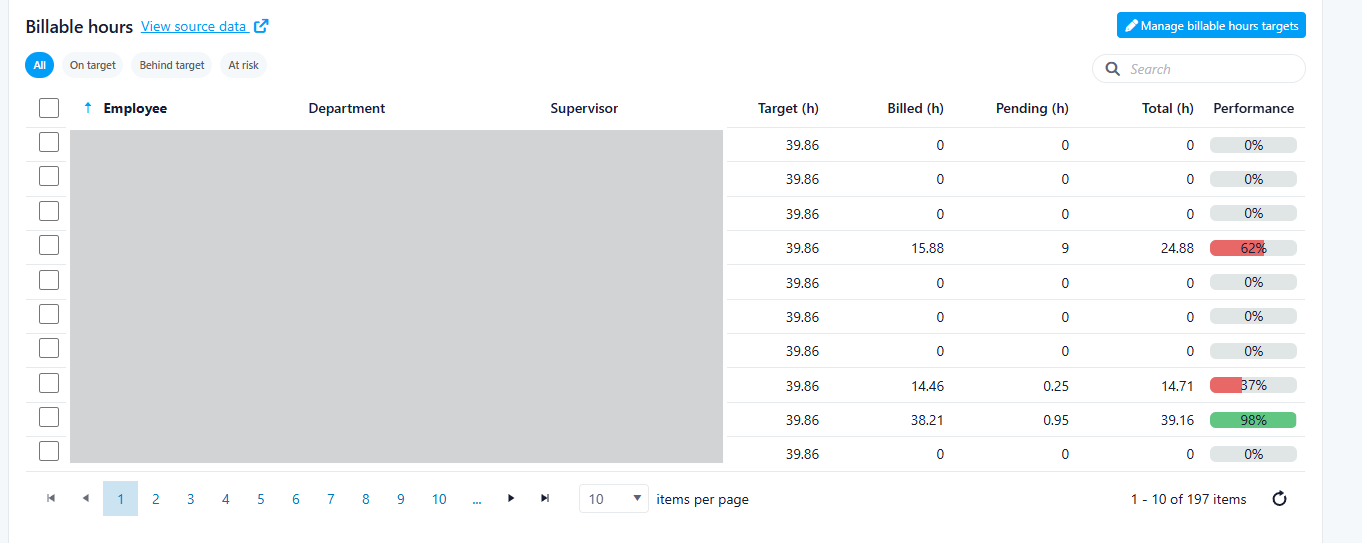
Previously, the Billable Hours section displayed a limited number of columns, restricting the amount of information available directly within the dashboard view.
What’s New
With this release, the Status column has been removed to optimize the layout and accommodate the following new columns:
- Supervisor
- Target
- Billed
- Pending
- Total
In addition, users can now select the number of records displayed per page using the new Items Per Page dropdown.
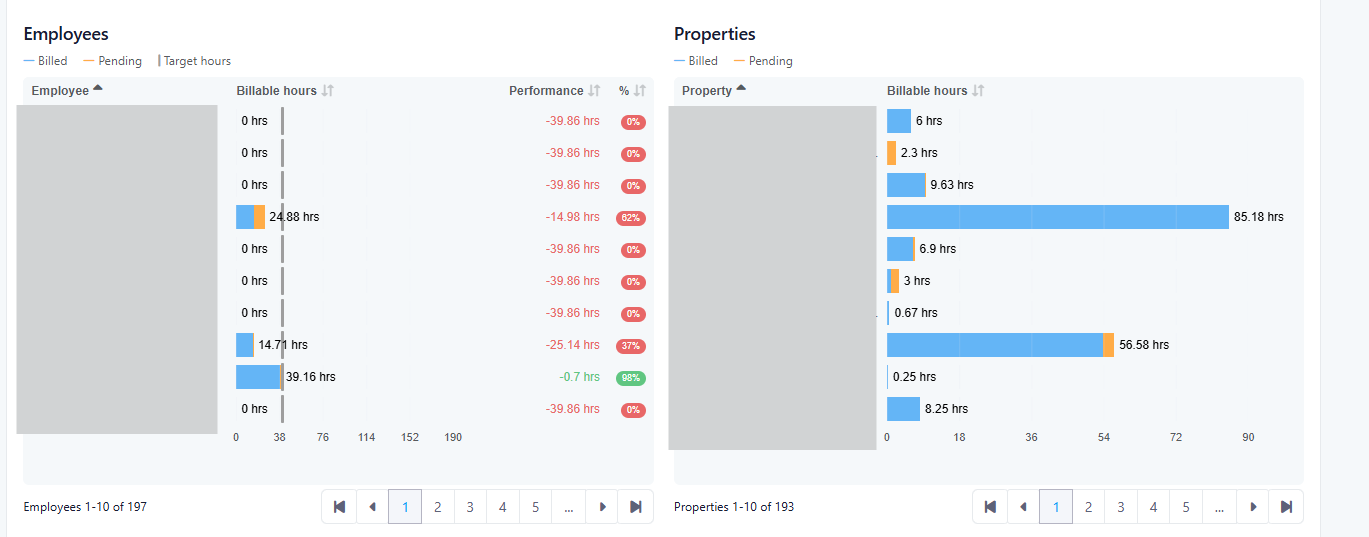
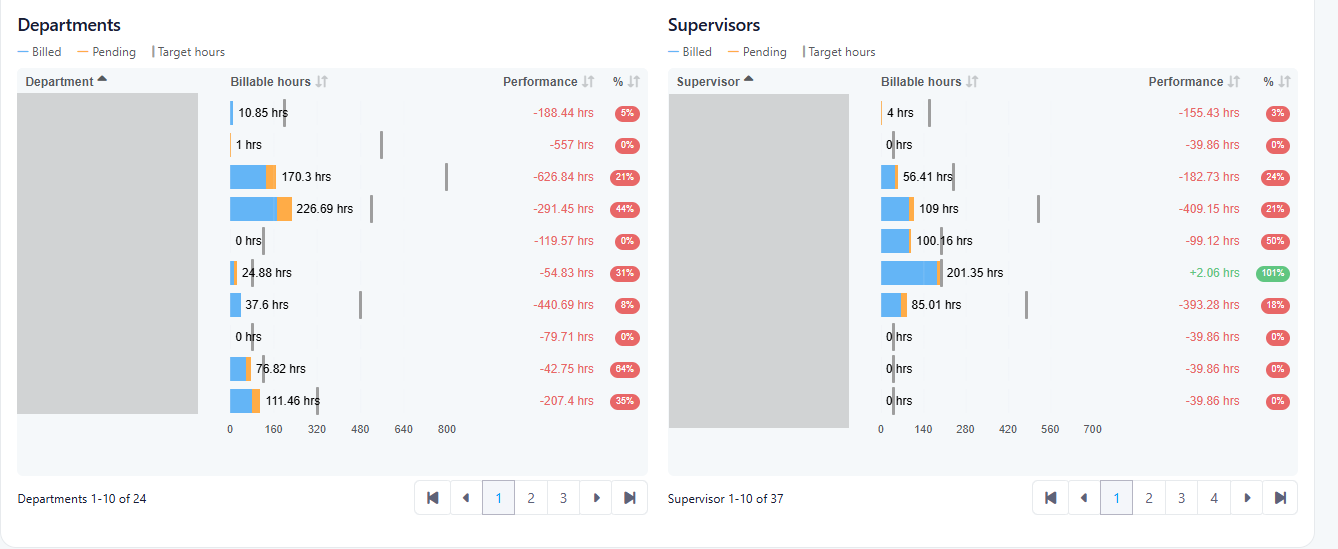
To further enhance reporting and analysis, three new summary table charts have been added:
- Departments
- Properties
- Supervisors
These additions provide users with a more comprehensive view of billable hour data across different organizational dimensions.
How It Works
The overall workflow and user experience remain unchanged. Existing navigation and functionality continue to operate as before, with the added benefit of enhanced visibility and reporting options.
Where to Find It
This feature is available in:
Dashboard > Billable Hours
Note: The Billable Hours Dashboard must be enabled within the employee profile to access this feature.
To Access It
- Navigate to Dashboard from the main menu.
- Select Billable Hours.
Benefits
- Enhanced Visibility: View critical performance metrics such as targets, billed hours, pending hours, and totals directly from the Billable Hours dashboard.
- Improved Analysis: New Department, Property, and Supervisor summary charts provide deeper insights into operational performance and resource allocation.
- Greater Efficiency: The customizable Items Per Page option and expanded data view reduce the need for additional navigation, helping users find information more quickly.

Vehicle QR Codes with Password Protection
Overview
This release introduces Vehicle QR Codes with Password Protection, designed to help residents, managers, and authorized security personnel quickly identify and validate vehicles while protecting resident privacy.
Past State
Previously, vehicle records did not support QR codes. Security personnel and managers had to manually search for vehicle information, and there was no secure way to associate a scannable QR code with a vehicle.
What’s New
With this release:
- A unique QR code is automatically generated for every vehicle.
- QR codes can be viewed and printed by residents and managers.
- Each QR code is protected by a vehicle-specific password.
- Authorized staff members (Property Managers, Building Managers, Security Guards, and Concierges) can access vehicle information without entering the password when logged into UpperBee with the required permissions.
- Vehicle records cannot be saved without a password.
- The Share option is only available when a password has been configured.
How It Works
Vehicle Creation and Password Validation
- When a vehicle is created, a QR code is automatically generated.
- A password is automatically generated for the vehicle.
- Residents can modify the password if needed.
- If a vehicle does not have a password, users are prevented from saving the record until a valid password is entered.
QR Code Access
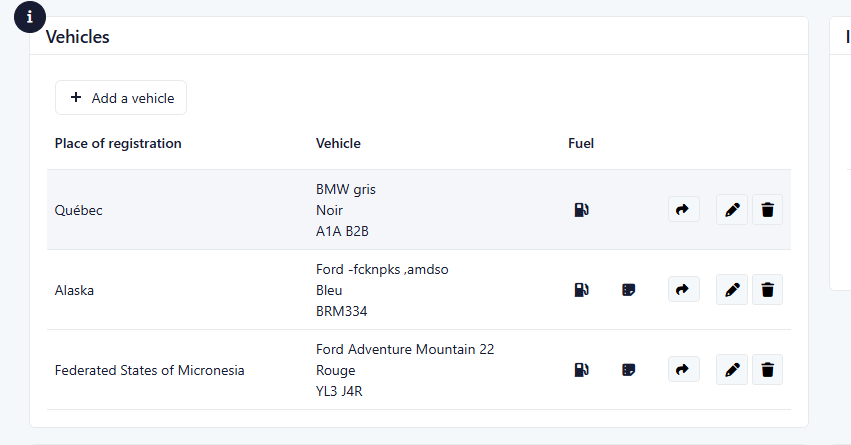
- Users can access the QR code from the Vehicle section.
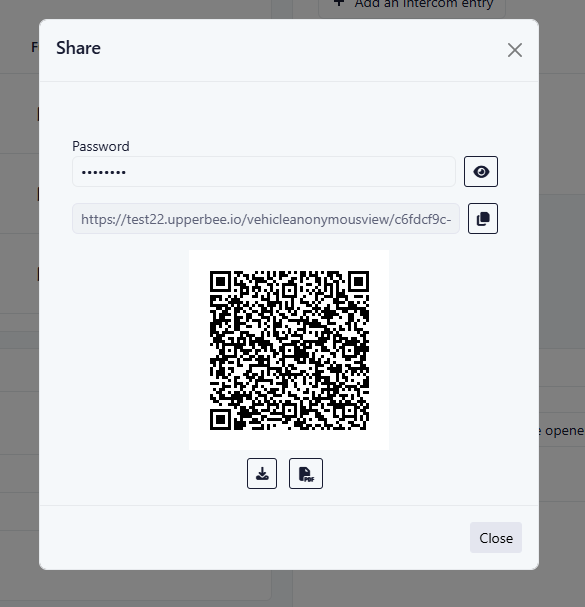
- Selecting the Share/QR Code option opens a modal displaying the QR code.
- Users can print the QR code directly from the modal.
QR Code Scanning
When a QR code is scanned:
Authorized logged-in users
- Property Managers
- Building Managers
- Security Guards
- Concierges
Authorized logged-in users can view vehicle information immediately without entering the vehicle password.
All other users
All other users must enter the vehicle password before vehicle information is displayed.
Vehicle Information Displayed
Once access is granted, the following information may be displayed:
- Building name
- Resident/Owner name
- Contact information
- Unit information
- Vehicle make and model
- Parking space
- License plate number
Where to Find It
Resident Portal
- Vehicles
- My Profile → My Vehicles
Management Portal
- Condominium Vehicle Details
- Condominium Vehicle Edit
To Access It
To access it:
- Open the Vehicles section.
- Select a vehicle.
- Click the Share/QR Code icon.
Benefits
- Improves vehicle identification and parking validation.
- Protects resident information through password-controlled access.
- Allows authorized staff to access information efficiently during inspections.
- Simplifies QR code printing and distribution.
- Improves operational efficiency for parking management.
Important Notes
- This feature applies to both existing and newly created vehicles.
- A vehicle password is required before the QR code sharing functionality becomes available.
- Share actions remain hidden when no password is configured.
- Access for authenticated staff follows existing role and building permission rules.
Second Week Of The Month
Third Week Of The Month
Last Week Of The Month