
Table of Contents
- Before You Begin
- Where to Find the Feature
- Recording Incoming Payments
- Cheques Received
- Credit Card, Bank Transfer, or Cash Payments
- One-Time Pre-Authorized Debit
- Pre-Authorized Debit Entry Options
- Collecting Outstanding Balances
- Pre-Authorized Debits for a Special Budget
Before You Begin
- Post an opening balance.
- Activate pre-authorized debits and configure them.
- Configure and enter residents’ banking information for pre-authorized debit payments.
- Have the details of the incoming payments available (cheques, bank statements for transfers, etc.)
Please note : Payments received from residents or tenants must be recorded before they can be included in a deposit. This applies to all payment methods, including cheques, pre-authorized debits, cash, and bank transfers.
The process has two steps:
- Record the payment in the property portal. This saves the payment details and applies the amount to the appropriate resident or account. You can record payments in advance, such as a series of cheques received from a resident.
- Create the deposit to group the recorded payments and deposit them. A payment must be recorded before it can be added to a deposit.
Where to Find the Feature
- Open the property portal.
- From the ACCOUNTING menu, select DEPOSITS, then open the CHECKS AND BANK DIRECT DEBITS
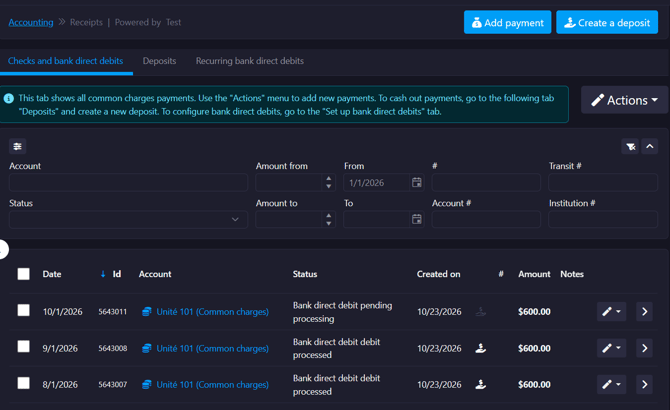
Recording Incoming Payments
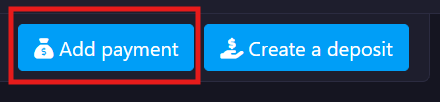
1. Click ADD A PAYMENT
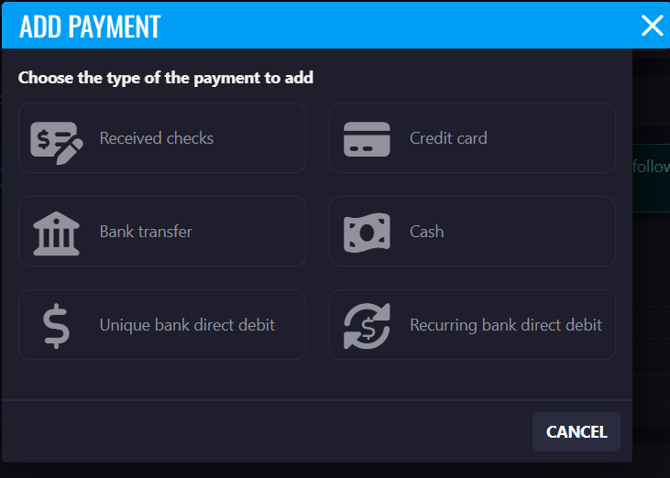
2. In the new window, select the payment type
Cheques Received
- In the checks parameters section, fill in the applicable information (*)
- The cheques will be generated in the list of Checks section below based on the information entered here.
- You can edit the amount, date, and cheque number for each generated cheque individually in the list of checks section.
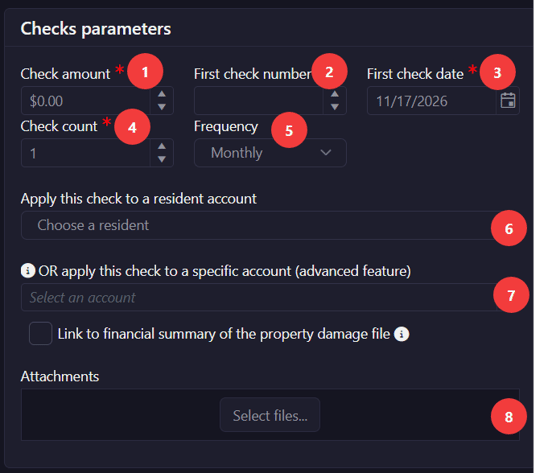
| Information | |
|---|---|
| 1 | Enter the amount for the series of cheques. If the cheques have different amounts, enter the amount used most often. Otherwise, enter any one of the amounts and adjust the individual cheques later. |
| 2 | Enter the number of the first cheque in the series. |
| 3 | Enter the date of the first cheque. |
| 4 | Enter the number of cheques received. |
| 5 |
Select the payment frequency : If the cheques apply to resident accounts, select the resident group to which they should be allocated |
|
If cheques apply to resident accounts, select the resident group to which they ahould be allocated : |
|
| 6 |
If the cheques apply to more than one resident group (for example, a resident and their company each own a condo and cover the fees with one payment), select one resident group, then select the other. The accounts associated with those groups will be added to the cheque list below. |
|
If the cheques apply to balance sheet accounts, select the account to which they should be allocated. |
|
| 7 |
If the cheques apply to more than one balance sheet account, select each account from the drop-down menu. The accounts will be added to the cheque list below. |
| 8 |
You can attach a document to the payment entry (for example, a scanned copy of the payments). |
2. In the cheque allocation section, fill in the applicable information.
- Allocate the total amount of the cheques among the accounts to which they apply.
- Use Allocate total amount to distribute the cheque amounts according to predefined rules, such as condo fees, outstanding balances, ownership shares, or an equal distribution among the accounts.
- The total allocated must match the amount entered for the series of cheques.
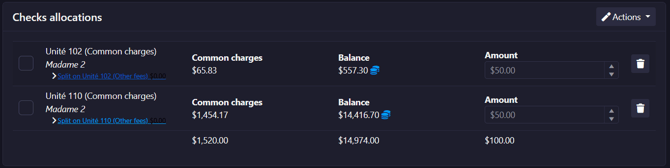
3. In the cheque list section, fill in the applicable information.
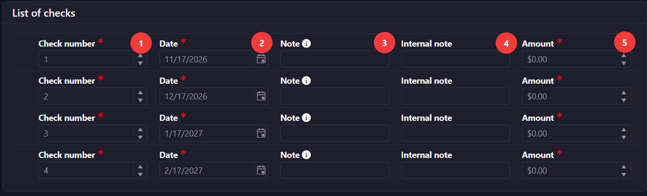
| Information | |
|---|---|
| 1 | Cheque number |
| 2 | Cheque date |
| 3 | A note specific to the cheque (for example, “For special assessment”), which will appear on the resident’s account statement |
| 4 | Internal note : Add relevant payment information that will be visible to employees and managers (optional) |
| 5 |
Amount written on the cheque |
- If this is the only series of cheques you need to enter, select Save only.
- If you have other cheque series to enter, select Save and add new.
- To create a deposit after saving, select Save and create a deposit.
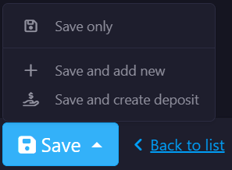
- Cheques entered in the portal will appear in the cheques and pre-authorized debits list. They will be available when creating a deposit once they are eligible to be deposited.
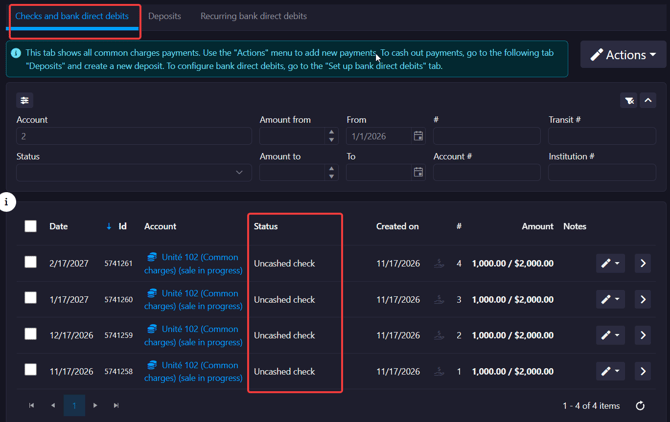
Credit Card, Bank Transfer, or Cash Payments
- Enter the applicable information.
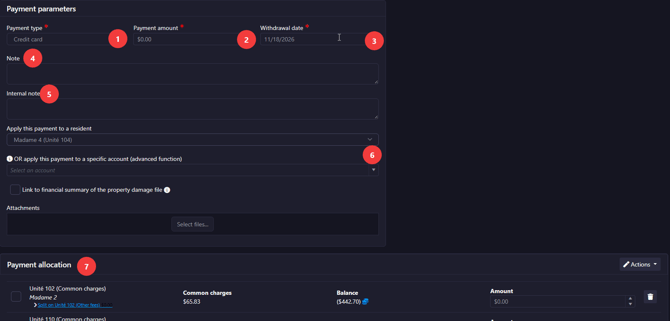
| Information | |
|---|---|
| 1 | Select the payment type. |
| 2 | Enter the payment amount. |
| 3 | Enter the date the payment was received. |
| 4 | Add relevant payment information (optional). |
| 5 | Add relevant payment information that will be visible to employees and managers (optional). |
| 6 |
Select the resident or account to which the payment applies. : If the payment is from a resident, select the resident from the first drop-down menu. If the payment applies to a specific account (for example, an insurance reimbursement), select the account to which it should be applied. |
| 7 |
Payment allocation : For example, if a payment covers both condo fees and moving fees, you can choose how to allocate the amount between the condo fee account and the other fee account. |
2. Click SAVE.
- If this is the only payment you need to enter, select Save only.
- If you have other payments to enter, select Save and add new.
- To create a deposit after saving, select Save and create a deposit.
- The payment will appear in the cheques and pre-authorized debits list. It will be available when creating a deposit once it is eligible to be deposited.
One-Time Pre-Authorized Debit
- Enter the applicable information.
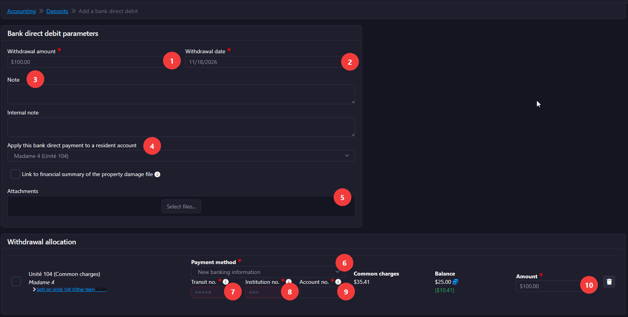
| Information | |
|---|---|
| 1 | Amount to debit |
| 2 | Debit date |
| 3 | Add relevant payment information to appear on the account statement (optional). |
| 4 | Resident group to be debited |
| 5 | Attachments, if needed |
| 6 | Payment method |
| 7 | Bank transit number |
| 8 | Bank institution number |
| 9 | Bank account number |
| 10 | Amount due |
- If this is the only payment you need to enter, select Save only.
- If you have other payments to enter, select Save and add new.
- To create a deposit after saving, select Save and create a deposit.
- The payment will appear in the cheques and pre-authorized debits list. It will be available when creating a deposit once it is eligible to be deposited.
Pre-Authorized Debit Entry Options
Under the ACTIONS button, select the applicable option.
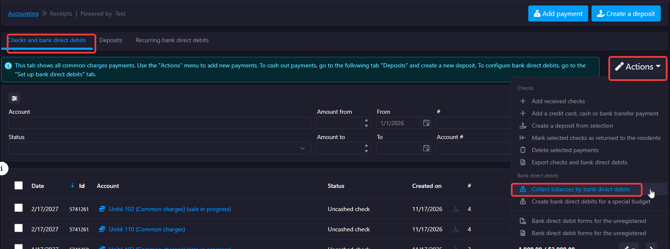
Collecting Outstanding Balances
Enter the following fields, then click GENERATE PRE-AUTHORIZED DEBITS.
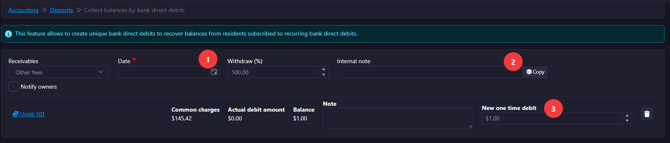
| No. | Information |
|---|---|
| 1 | Date on which to process the debit |
| 2 | Note related to the debit :
|
| 3 |
Debit amount
|
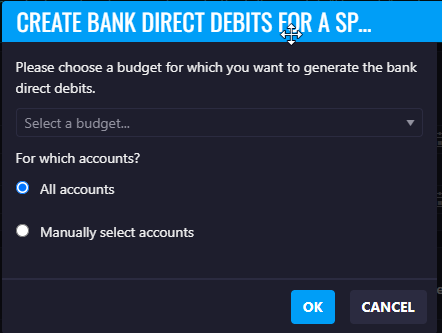
Pre-Authorized Debits for a Special Budget
Select the applicable budget.
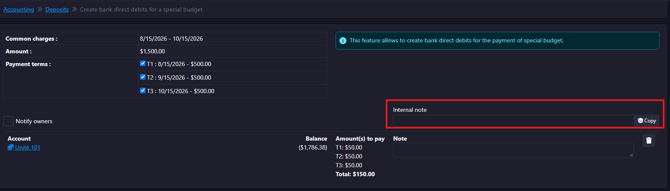
You can enter a note in the box at the top, then click Copy to apply it to all debits.
Once the cheques and pre-authorized debits have been recorded, you can create the deposits.